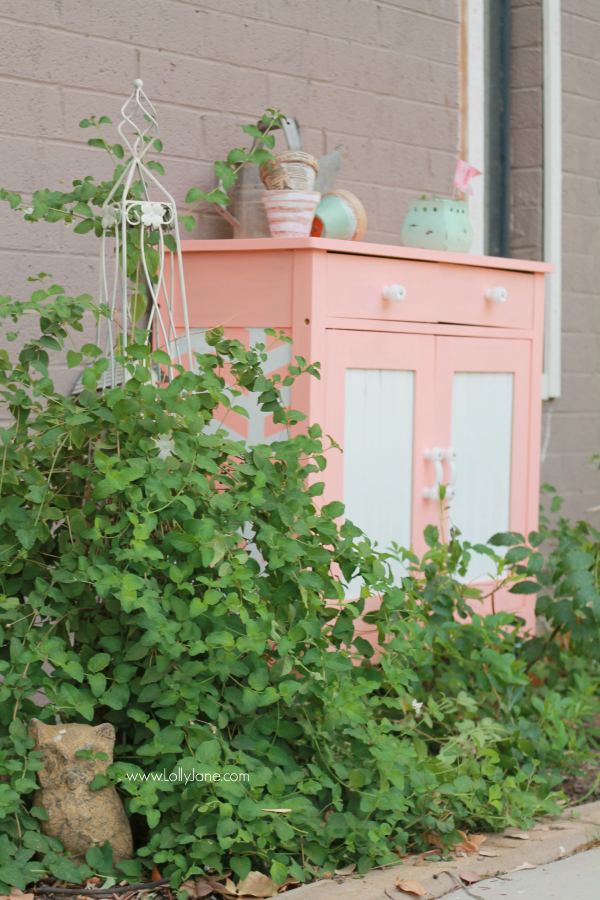
DIY rolling garden cart
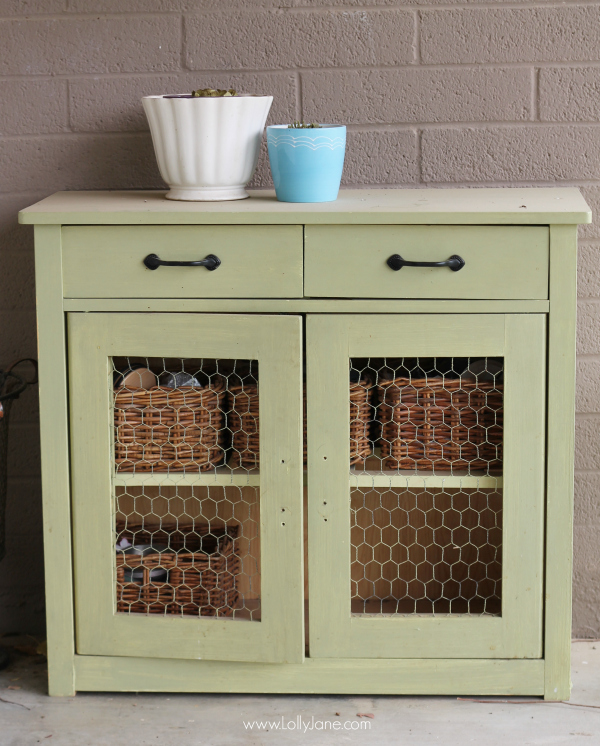
Hello green thumbs! If you’re a big gardening fan, this tutorial is for you! We’re black thumbs but still appreciate a pretty piece of furniture, even if it’s intended for the outdoors! Kelli’s had this cabinet since her family began over twelve years ago. Our cute mom bought it for her and her new groom shortly after they married since their first apartment was tight on space. Before painting furniture was trendy in 2008, she painted it green with acrylic paint one night when said groom was working late. Yes, acrylic paint from a little bottle, lol! She’s kept it for the nostalgia and was happy to give it yet another face lift. It’ll probably get painted again, re-purposed another 6 years down the road but for now, we are loving her DIY rolling garden cart.
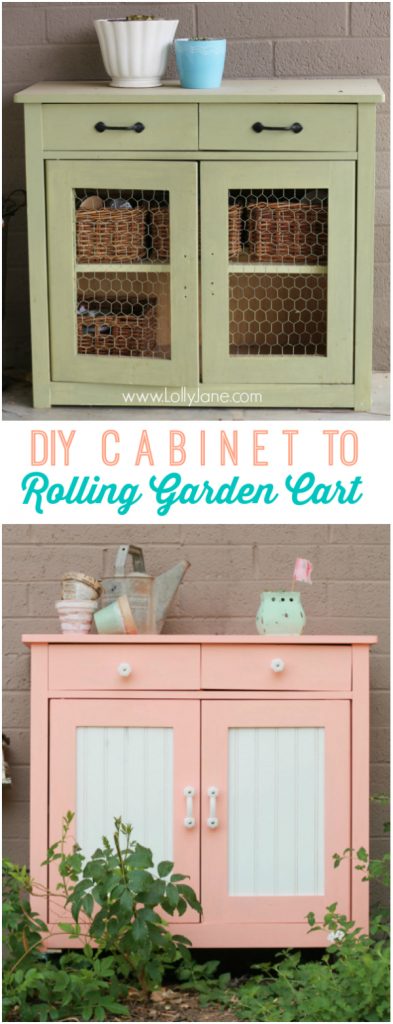
Here’s the cabinet in all its glory before its makeover.
To turn it into a rolling garden cart, you’ll need a few staple supplies. Two colors of paint, 2 foam brushes, painters tape (we prefer 3M™ Safe Release™ Painter’s Tape Advanced + Delicate Surfaces with Edge- Lock™), sanding blocks (we like these 3M™ Advanced Abrasives), strong tape (we love this Scotch® Tough Duct Tape).
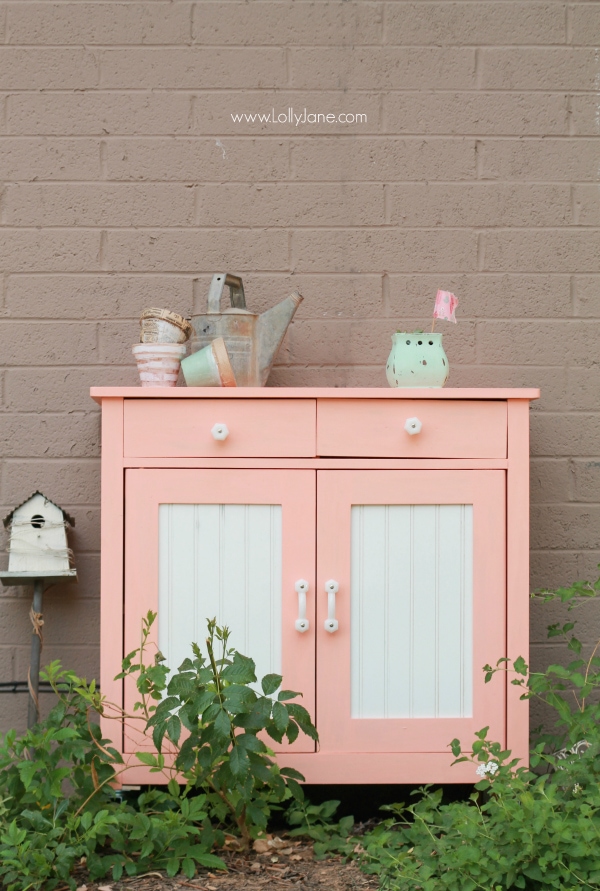
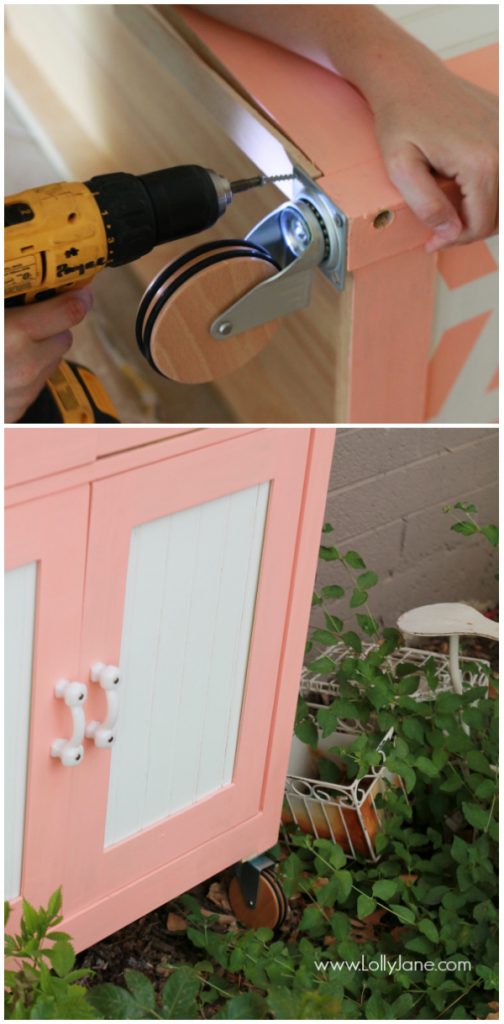
To spice up your cart, grab some gorgeous white milk glass knobs, pulls and casters.
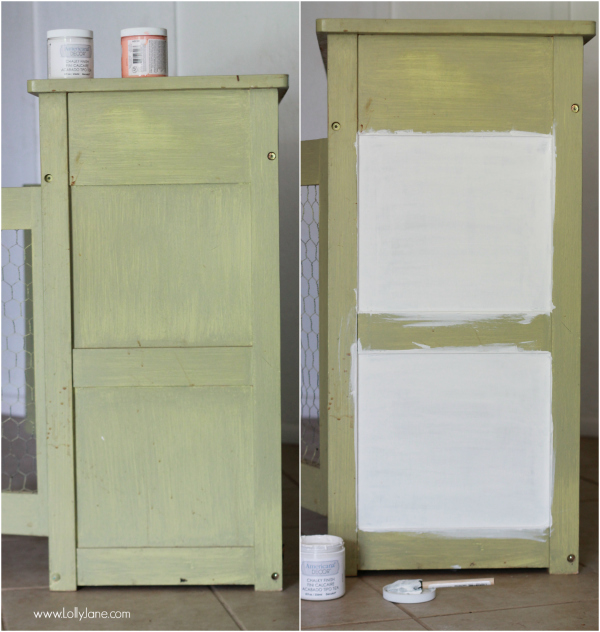
First up, I painted the indents in the side of the cabinet white. For this I used chalky paint because it requires no sanding or priming…score!
Next up, painting a herringbone pattern using tape. This is a pretty easy project, although tedious as it’s very repetitive. I started off making two vertical lines that run parallel to each other. I eye-balled how close they were to the sides but made sure they were exactly 3.5″ apart the full length down. I then started in with the left line and put a piece of tape diagonal to the second line. I followed the same technique when painting my moose head sign: start with 1 piece of tape which will stay down. Repeat with two more piece of tape. Lift the second piece of tape up and make it your fourth piece of tape, and so on. Basically, that middle piece of tape is your spacer. Easy, right? After you have your lines in the middle, repeat the process for the right side, with the diagonal going up and left. Then do the left side, with the diagonal going down and left. Paint inside the tape coral. When dry, peel the tape off. Notice how crisp the tape lines are when using going down and left. Paint inside the tape coral. When dry, peel the tape off. Notice how crisp the 3M™ Safe ReleaseTM Painter’s Tape, I purposely used the delicate surface as I’m an impatient painter and knew the delicate tape wouldn’t peel off my freshly coated white paint.

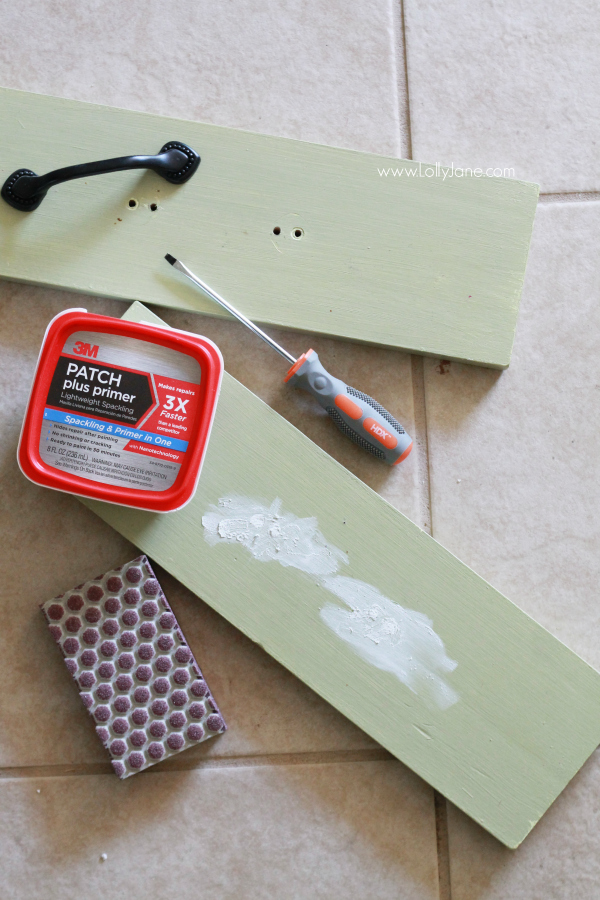
For the hardware, I had to do a little DIY action since I wanted to use custom hardware that didn’t come with this piece. Easy fix! I used 3M™ Patch plus primer and used my finger to generously fill each hardware hole. It dried within 20 minutes so I was able to use the 3M™ Advanced Abrasives Sanding Blocks and smooth them down to the drawer level. So easy and this technique gives you the ability to use whatever drawer knobs and pulls you prefer.
Don’t put away your tools yet, next up is swapping out the chicken wire for light weight bead board door inserts. This is a fast switcheroo, just grab a miter saw and a pencil! Remove the old door inserts. Using scrap bead board, measure your drawer insert size. Cut it to size on your saw and sand it down a little if you like the distressed look, which we love. Next you’ll simply tape the bead board into place. Yes, tape. Scotch® Tough Duct Tape is just that: tough. It’s strong enough to hold the wood into place without budging. You’ve just sawed in 110 degree weather, who wants to glue after all that!? And bonus, it’s transparent so when it’s propped open, it’s still easy on the eyes.
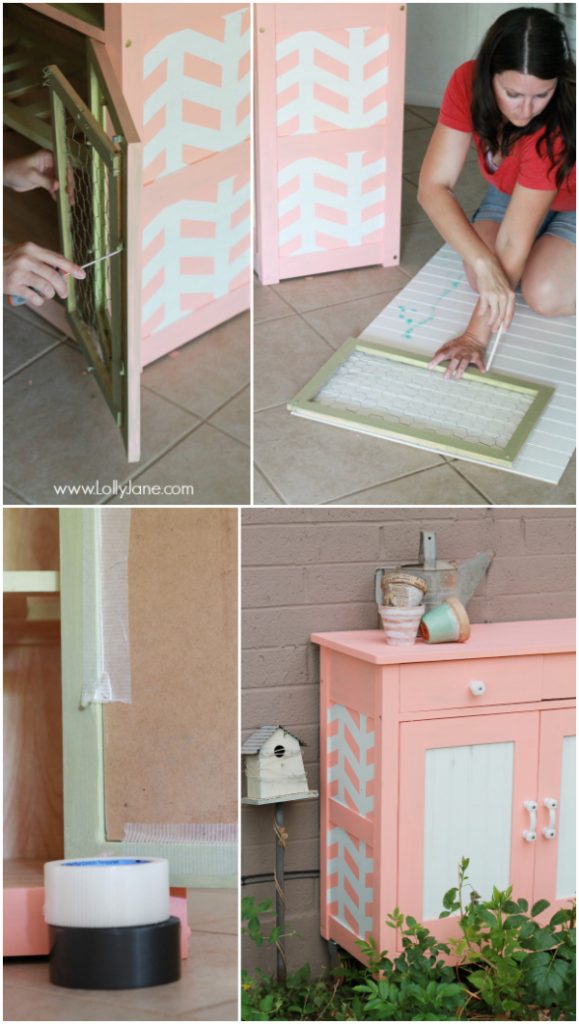
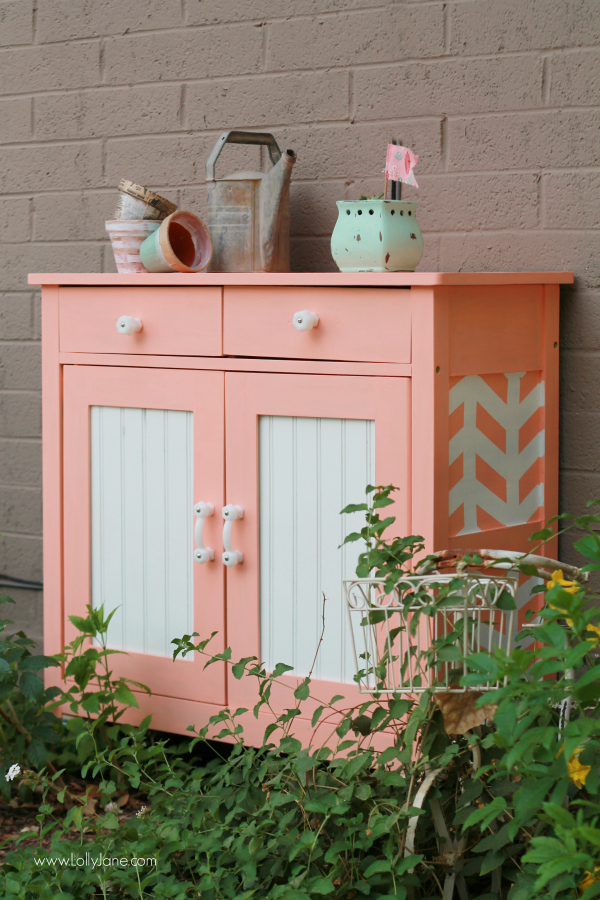
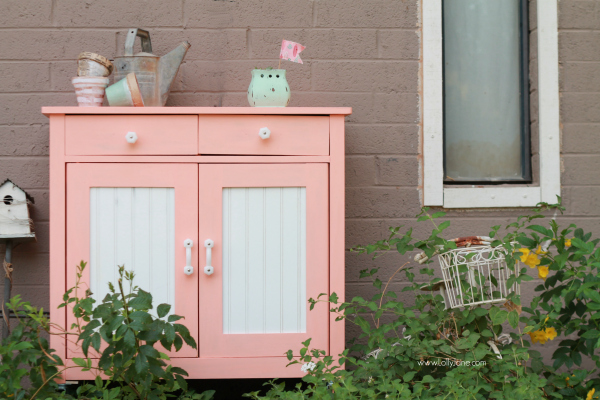
Now you’re ready to finish painting the rest of the piece coral. I just used the cheap foam brushes and painted the cabinet indoors whilst listening to music. Very therapeutic! Screw in some casters to the bottom for added height and to give it a finished look. For a garden cart, the rolling function is a must! How easy to store all your goods inside and take it with you around the yard. These large casters make it easy to move this pretty piece around.
There you have it! A pretty coral rolling garden cart, complete with a herringbone pattern for a splash of FUN! I love it!
Check out the before/after, what a difference!
As soon as I get my house painted, I can start working on some more fun garden ideas like these!
Thanks, 3M, for letting us test out new products! Keep up with them on Facebook, Twitter + Pinterest. And thank you, readers, for supporting companies that keep LJ rollin’ I am proud to be a 3M- sponsored blogger, and, as part of my responsibilities, I get the opportunity to evaluate new products from 3M DIY. Opinions are my own and additional product used in the project were selected by me.
Love chalky finish paint? Be sure to check out all of our DecoArt projects like our craft room furniture,
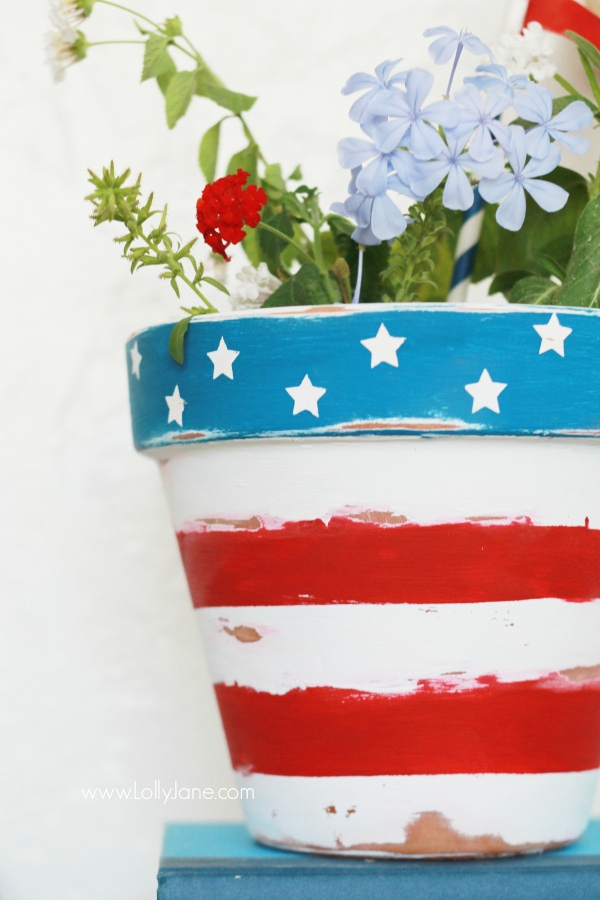
and our stars & stripes pot.
And a huge shout out to D. Lawless Hardware, love the beauties shown on the cabinet. Check em out for all your hardware needs, fast and affordable!!


I’ve always wanted to grow my own garden, but I just don’t have the talent for it. I sometimes think I have to be born a green thumb just to grow something.
Thanks so much, Dana!!
XO
Loving this idea! This blog is sooooo adorable! So many great ideas! Thanks 🙂
Thank you, Jenn!!
XO
That color!!! Amazing as always!!
Thanks so much, Aniko!! XO
Love this…Featuring you tomorrow at Work It Wednesday! Wonderful job! Hope to see your next project tomorrow;-)Xo
Haha! DEAL!! 😀 xoxo
I’d take your pictures so you could paint things for me;)
What a trade, we’d love it, Miq!
Oh my goodness!! LOVE this so much. That color is to die for. Wish you were my neighbors so you could paint all the things. I’d bring cookies in exchange. xo
Thanks, V! D Lawless has fab inventory! The casters are so fun!
Cutest cart ever! I love those wooden casters. Great job!
Ahhh thanks, Melissa!! We are big fans of color around here 🙂
Ah haha! You’re funny, Trisha!
Absolutely love this! When I build our new home I am so hiring you girls!
Love the way it turned out!! Soooo pretty!