How To Paint a Plastic Playhouse Like a Pro!
Transform any plastic playhouse into a stunning cottage with spray paint! you won’t believe the before picture of this little Tikes Playhouse makeover!
If you’re visiting from Instagram, welcome and thank you for being here! 🙂
When Homes.com challenged us to compete against two other creative bloggers for a charity event to create the “ultimate Little Tikes playhouse makeover,” we were in! Our kids grew up on their products, just like we’re sure yours have…. except my oldest baby just got her drivers license this week so long gone are the days of cute plastic toys to play on. I’m glad I have this for future grands! 😉
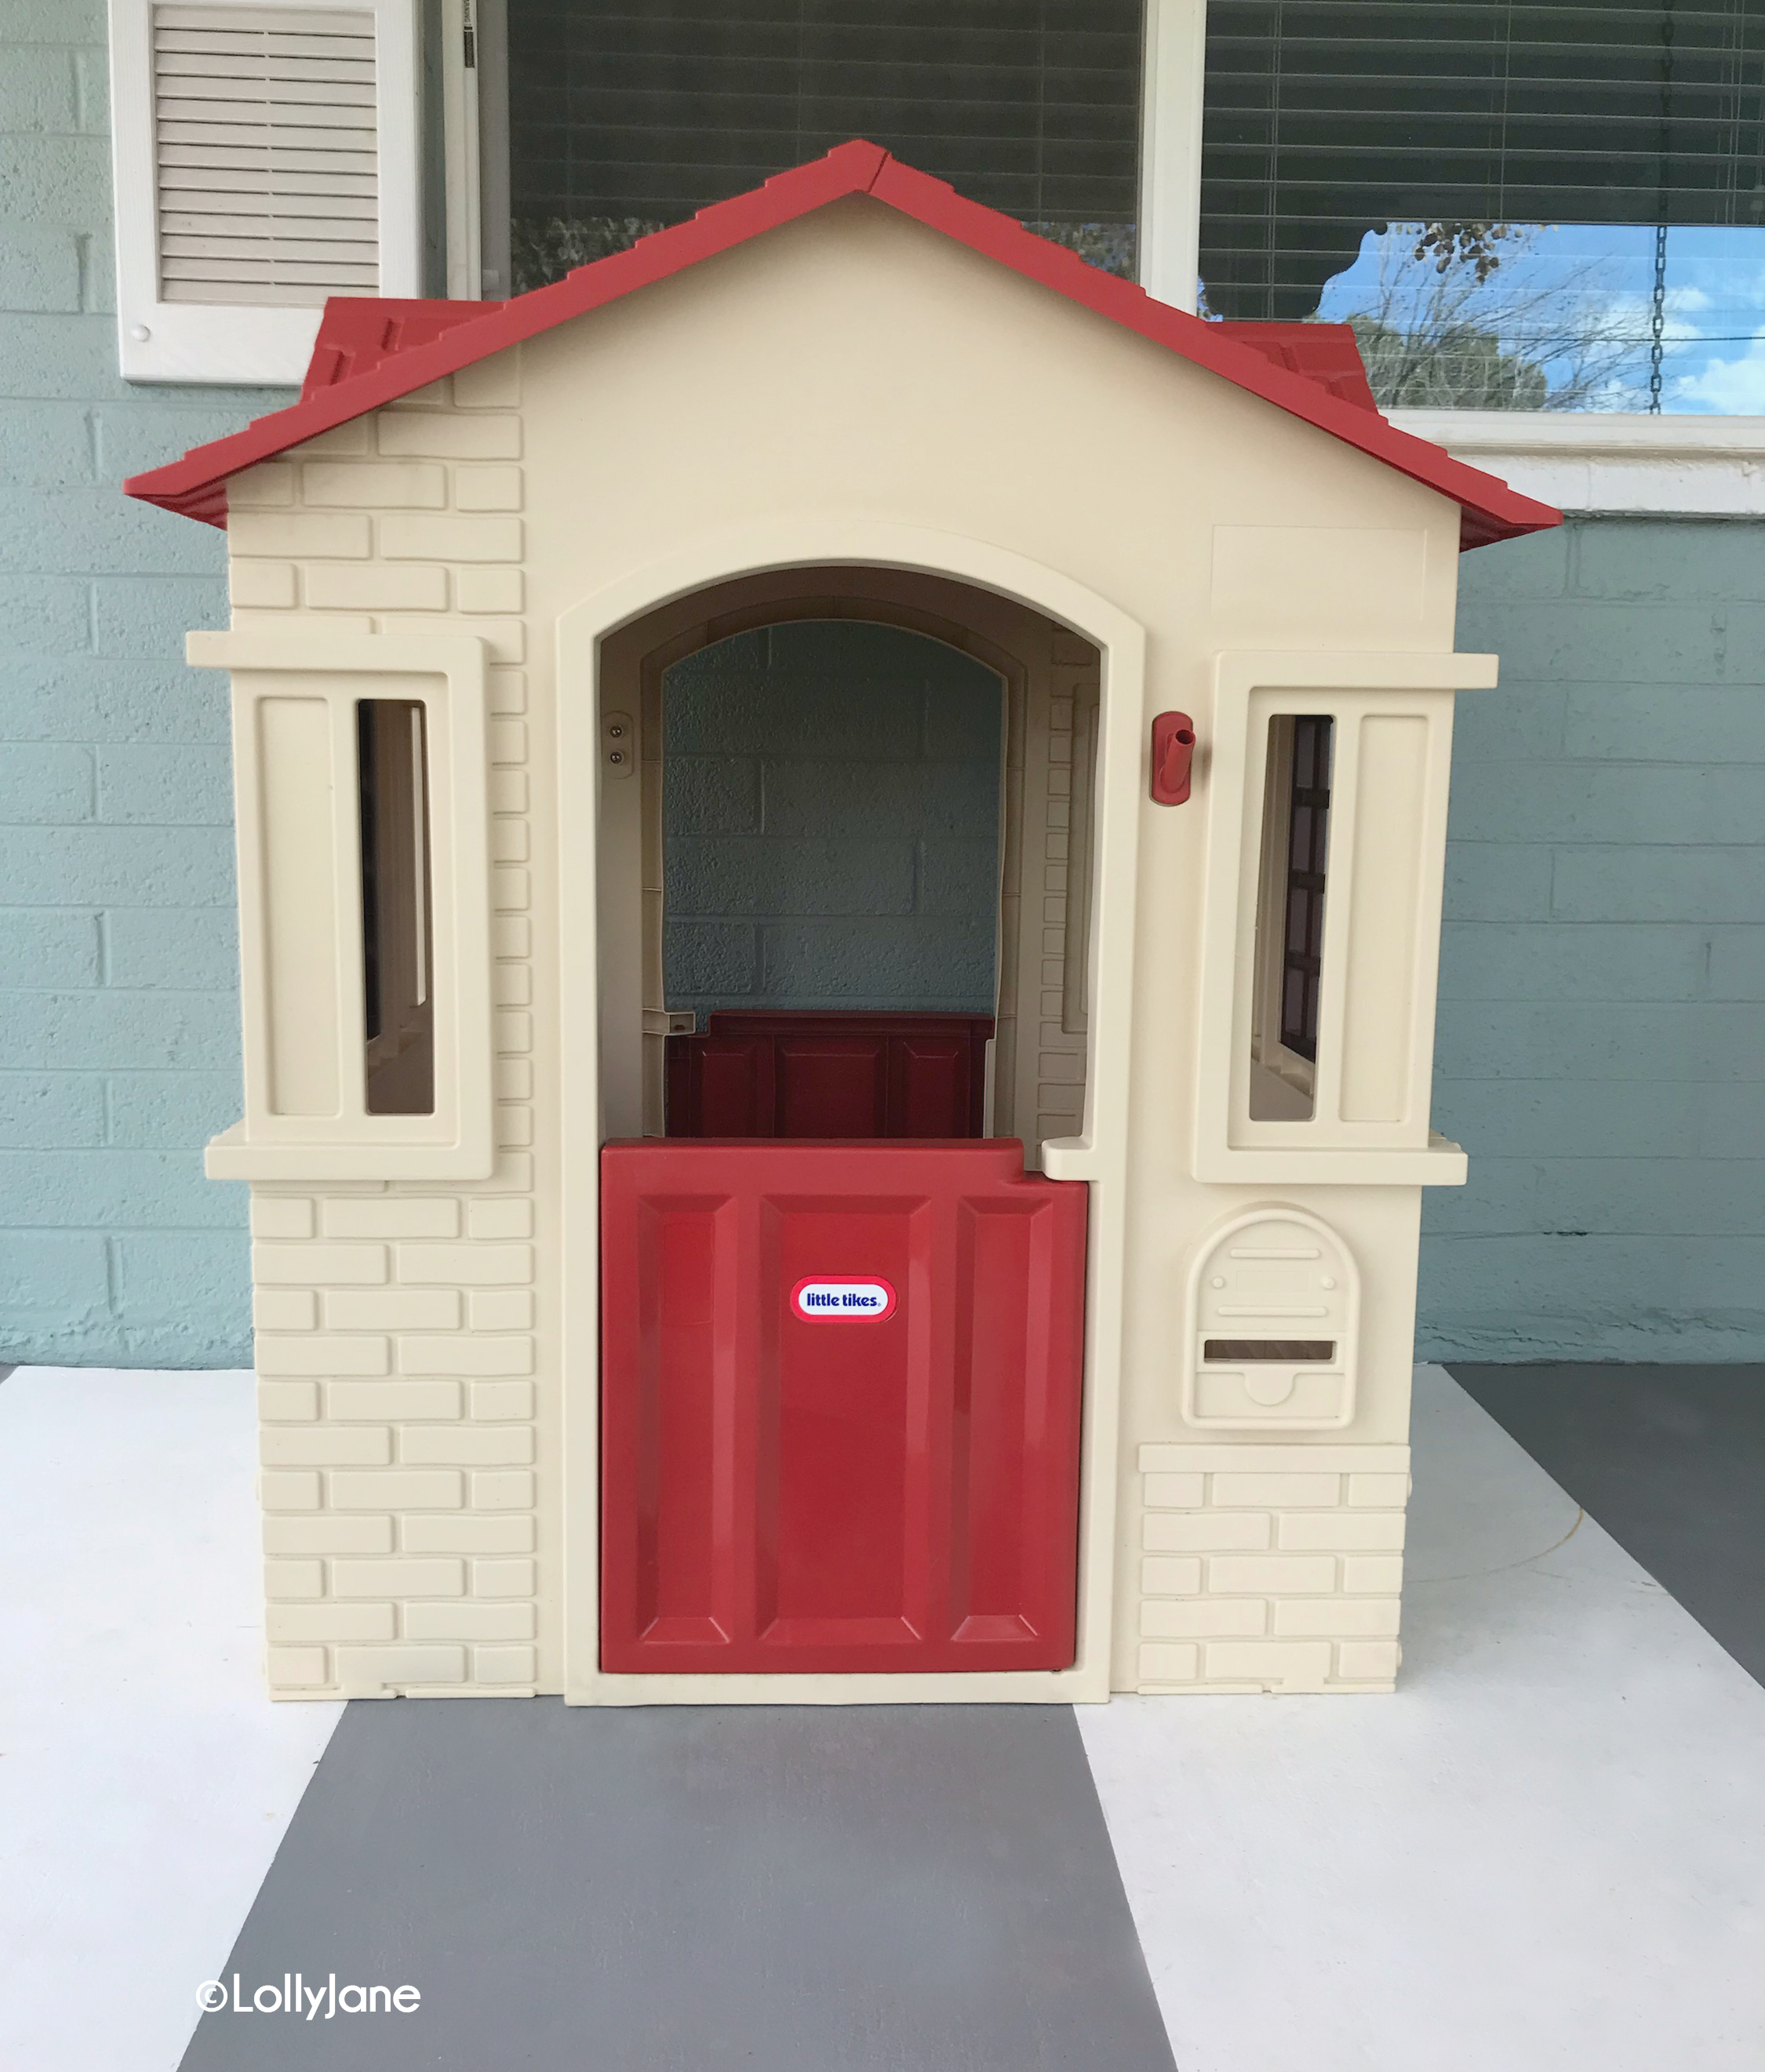
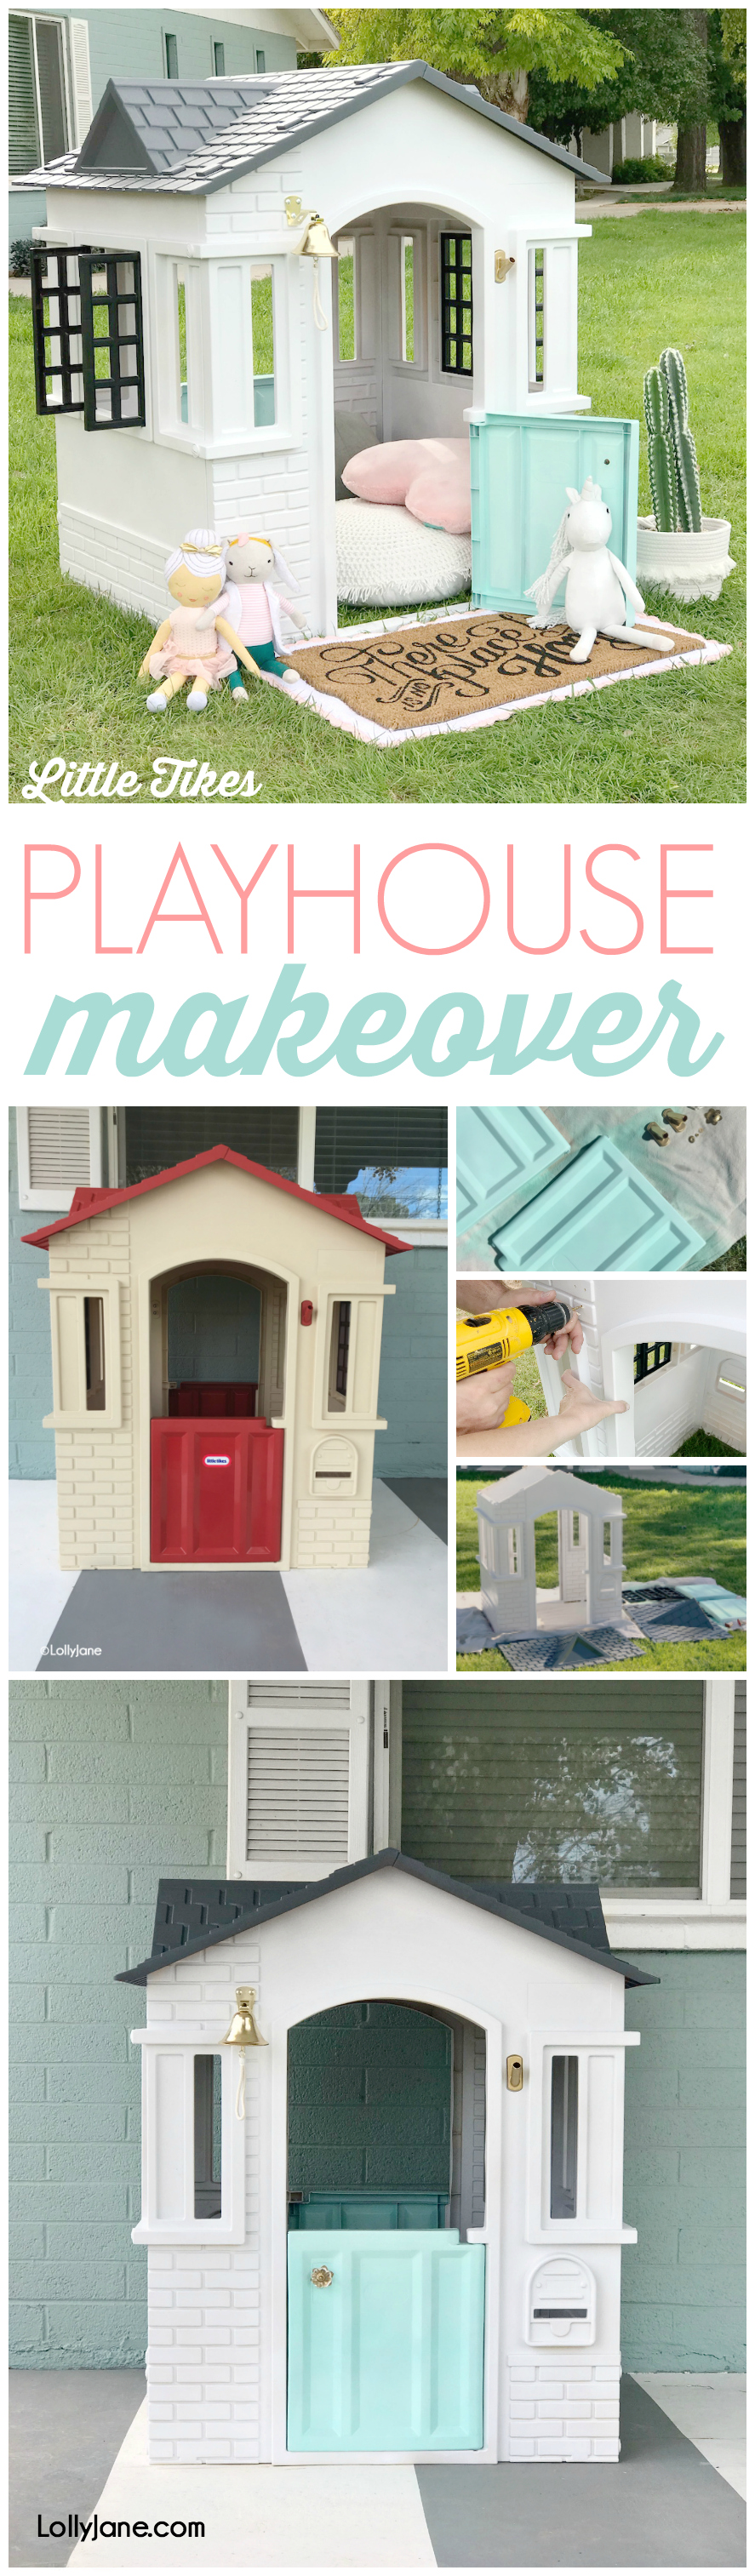
Check out the “before” playhouse…
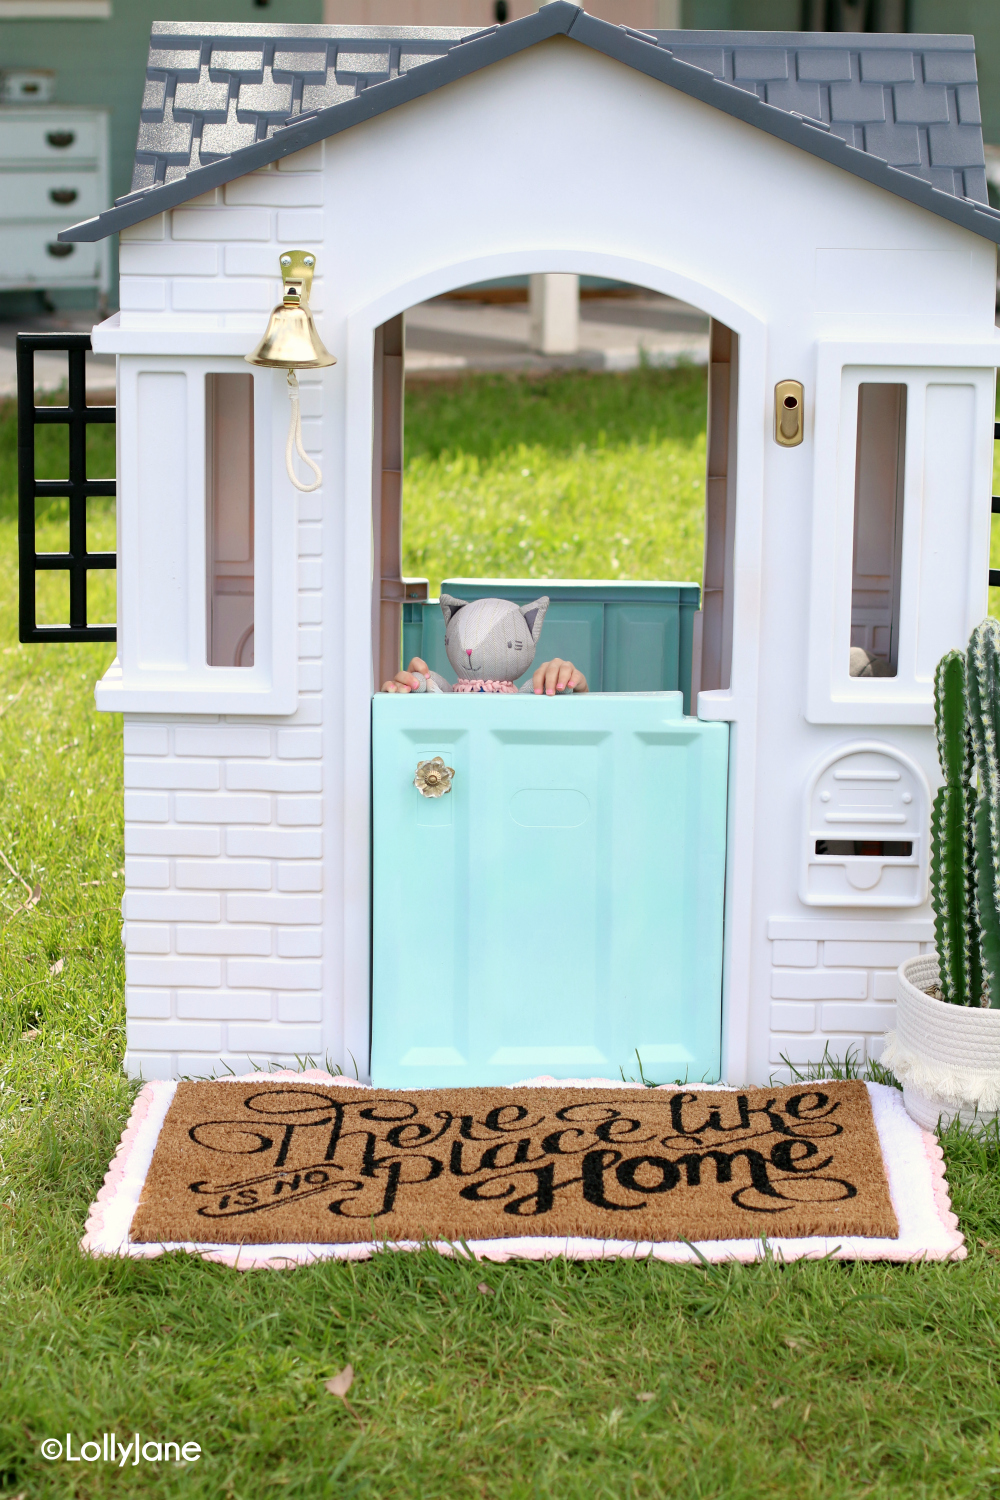
…and the “after!”
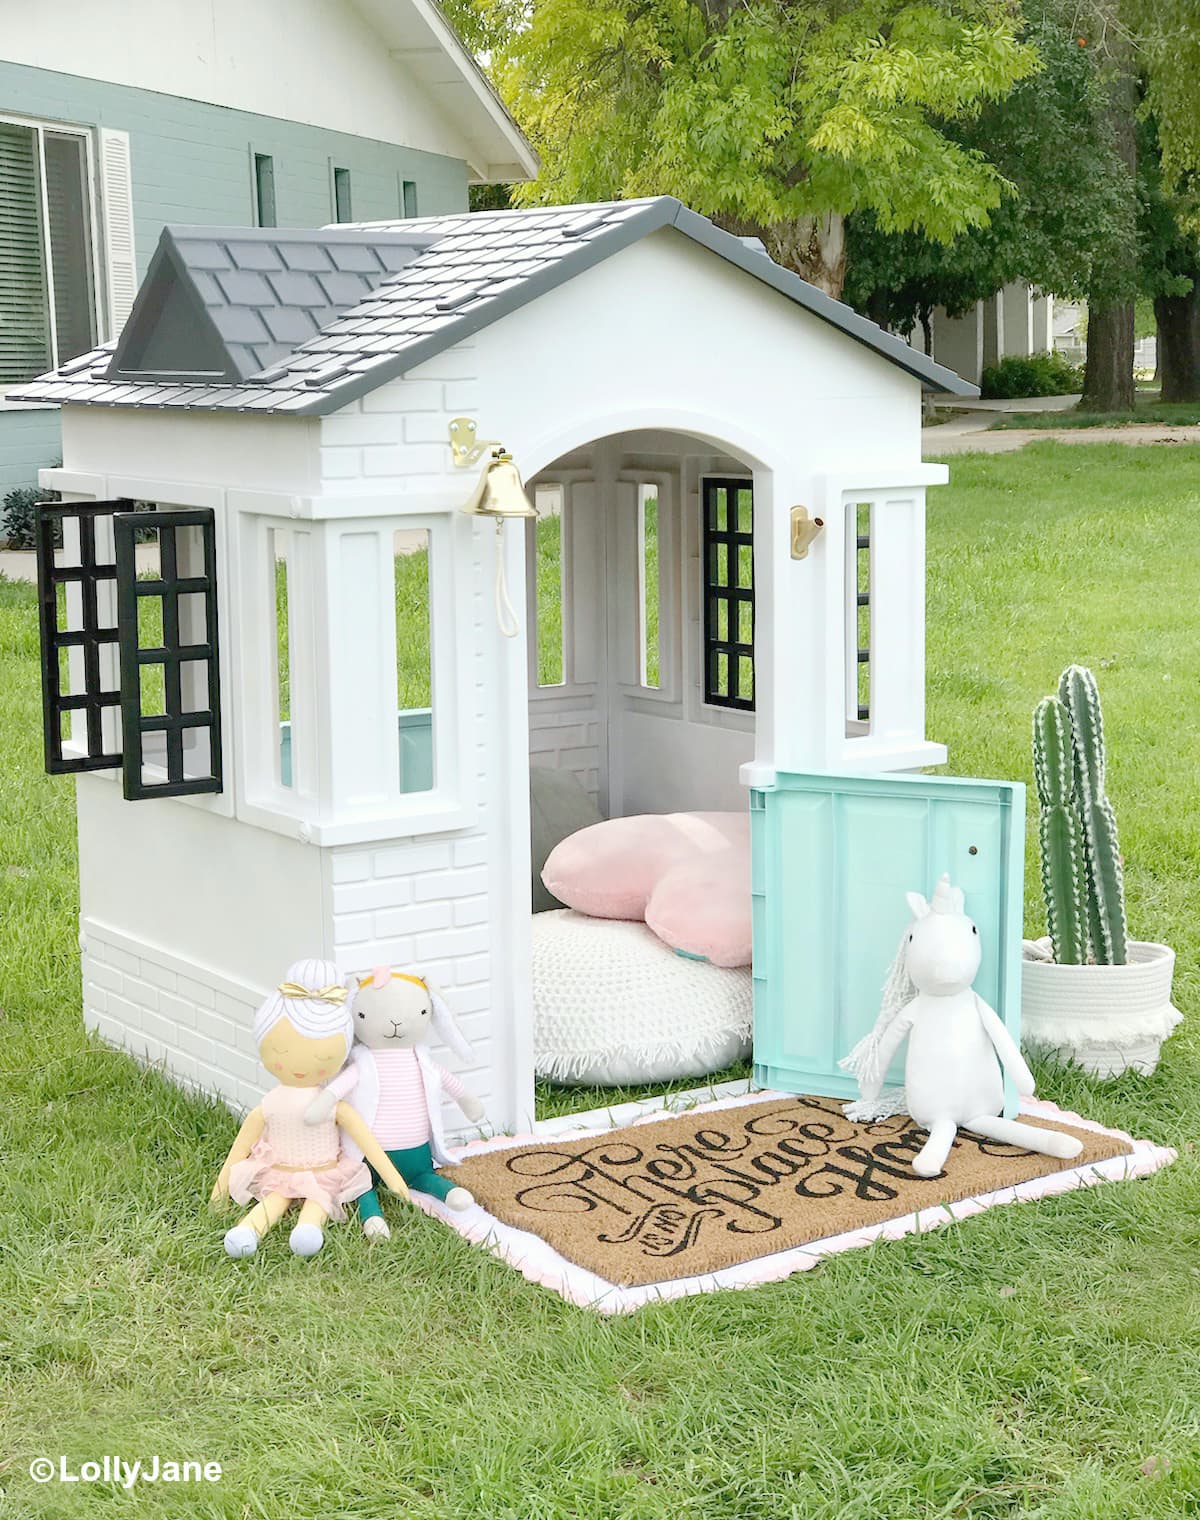
I’m gearing up for a new dark roof on our own home so it was fun to play with colors on this little cottage to see how we liked the color scheme. We’re, of course, partial to pink front doors but thought this pretty beachy blue would be fun for either gender!
How to Paint a PLASTIC Playhouse
Read on for the full step-by-step on how to paint a plastic playhouse. Leave any further clarifications or questions you have in the comments– we’d love to hear from you! 🙂

Supplies to PAint a plastic playhouse
We first made a run to our local hardware store and grabbed spray primer, the five colors we wanted to use (black shutters, charcoal roof, white house, aqua door + gold finishes) and polished off shopping with an online purchase of a gold bell and a glass knob to put on the door.
We’ve linked our supplies on both Amazon and Home Depot for you, depending on where you shop.
We used Rustoleum’s 2X line and had great luck with it. Be sure you use spray paint that says PLASTIC on it.
Note: Some links may be affiliate links. That means we may make a commission if you use our links to purchase, this is at no extra added cost to you! Thanks for supporting Lolly Jane!
- Spray Primer x 1 can (just for the door)
- Plastic Friendly Spray Paint: 5 cans: body = 2 cans, roof = 2 cans, door = 1 can
- Spray Sealer x2
Spray Paint Colors Used to paint plastic PLAYHOUSE
- Gray Roof: Granite
- Black Shutters: Canyon Black
- Blue Doors: Ocean Mist
- White Interior/Exterior: White
Does it matter which sheen (finish) you use to paint the playhouse? No it’s a personal preference. We used a semi-gloss so it can be wiped down easier.
How to paint little tikes plastic PLAYHOUSE COTTAGE
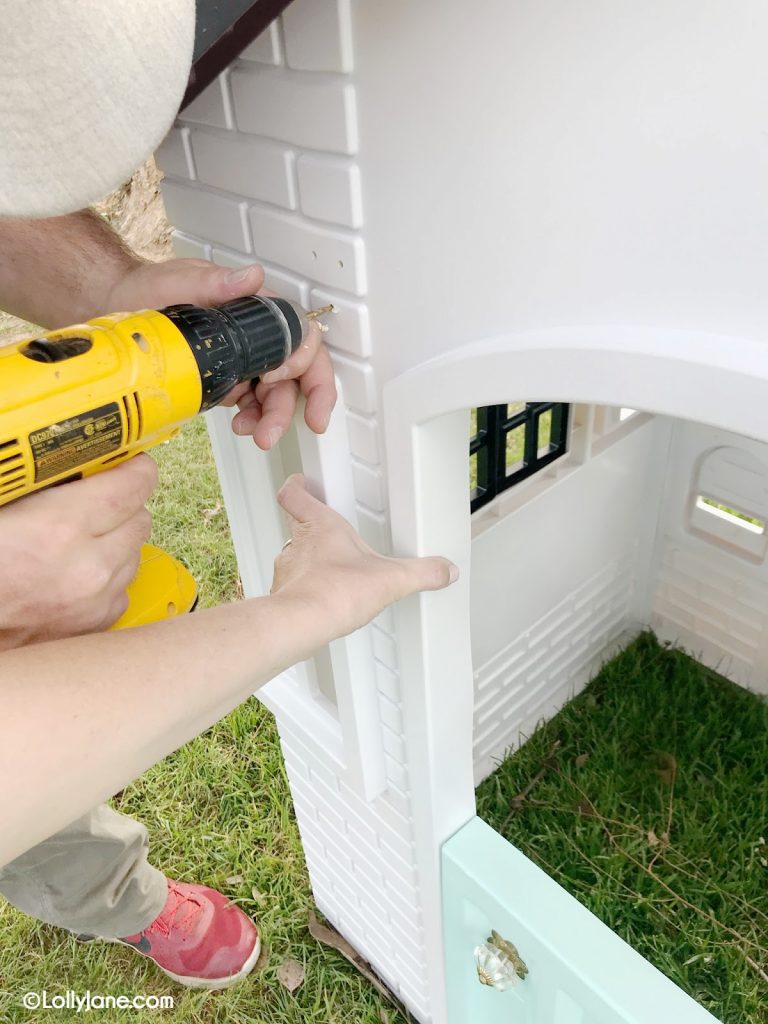
TAKE PLAYHOUSE APART. Whether you’re painting a new plastic playhouse in the box OR a used/put together plastic playhouse, your first step is to take it apart as it’s MUCH easier to paint each piece individually versus taping off sections. (Note: we strongly advise against taping off over fresh paint on plastic as the tape WILL pull the paint off.)
CLEAN THE PLAYHOUSE. Prior to painting, make sure the plastic is clean; if it’s been outdoors, remove all loose dust by spraying it down the towel drying or letting the sun dry it out.
LAY EACH PIECE ONTO A CANVAS DROP CLOTH. Once completely dry (paint will not stick to wet plastic) lay each piece of the playhouse in sections onto a canvas drop cloth. Note: a plastic drop cloth will peel off paint so we highly suggest using a canvas drop cloth … we may or may not have learned this from experience if you saw our Instagram stories, LOL!
USE A PLASTIC FRIENDLY SPRAY PAINT. Make 100% sure your spray paint is meant for PLASTIC. It’s meant to adhere specifically to plastic and is also meant to withstand the great outdoors. Don’t skimp on this step.
PRIME THE DOOR. If you’re using our same model playhouse, there’s no need to prime the whole house, just the door. The door is made of a slightly different plastic and is extra slick so definitely prime both sides of the door and allow to dry according to the can’s directions before spray painting your final color. If you’re unsure of the plastic materials in your house, take the extra step and prime. No need to sand beforehand but priming will just add to your final lasting effects.
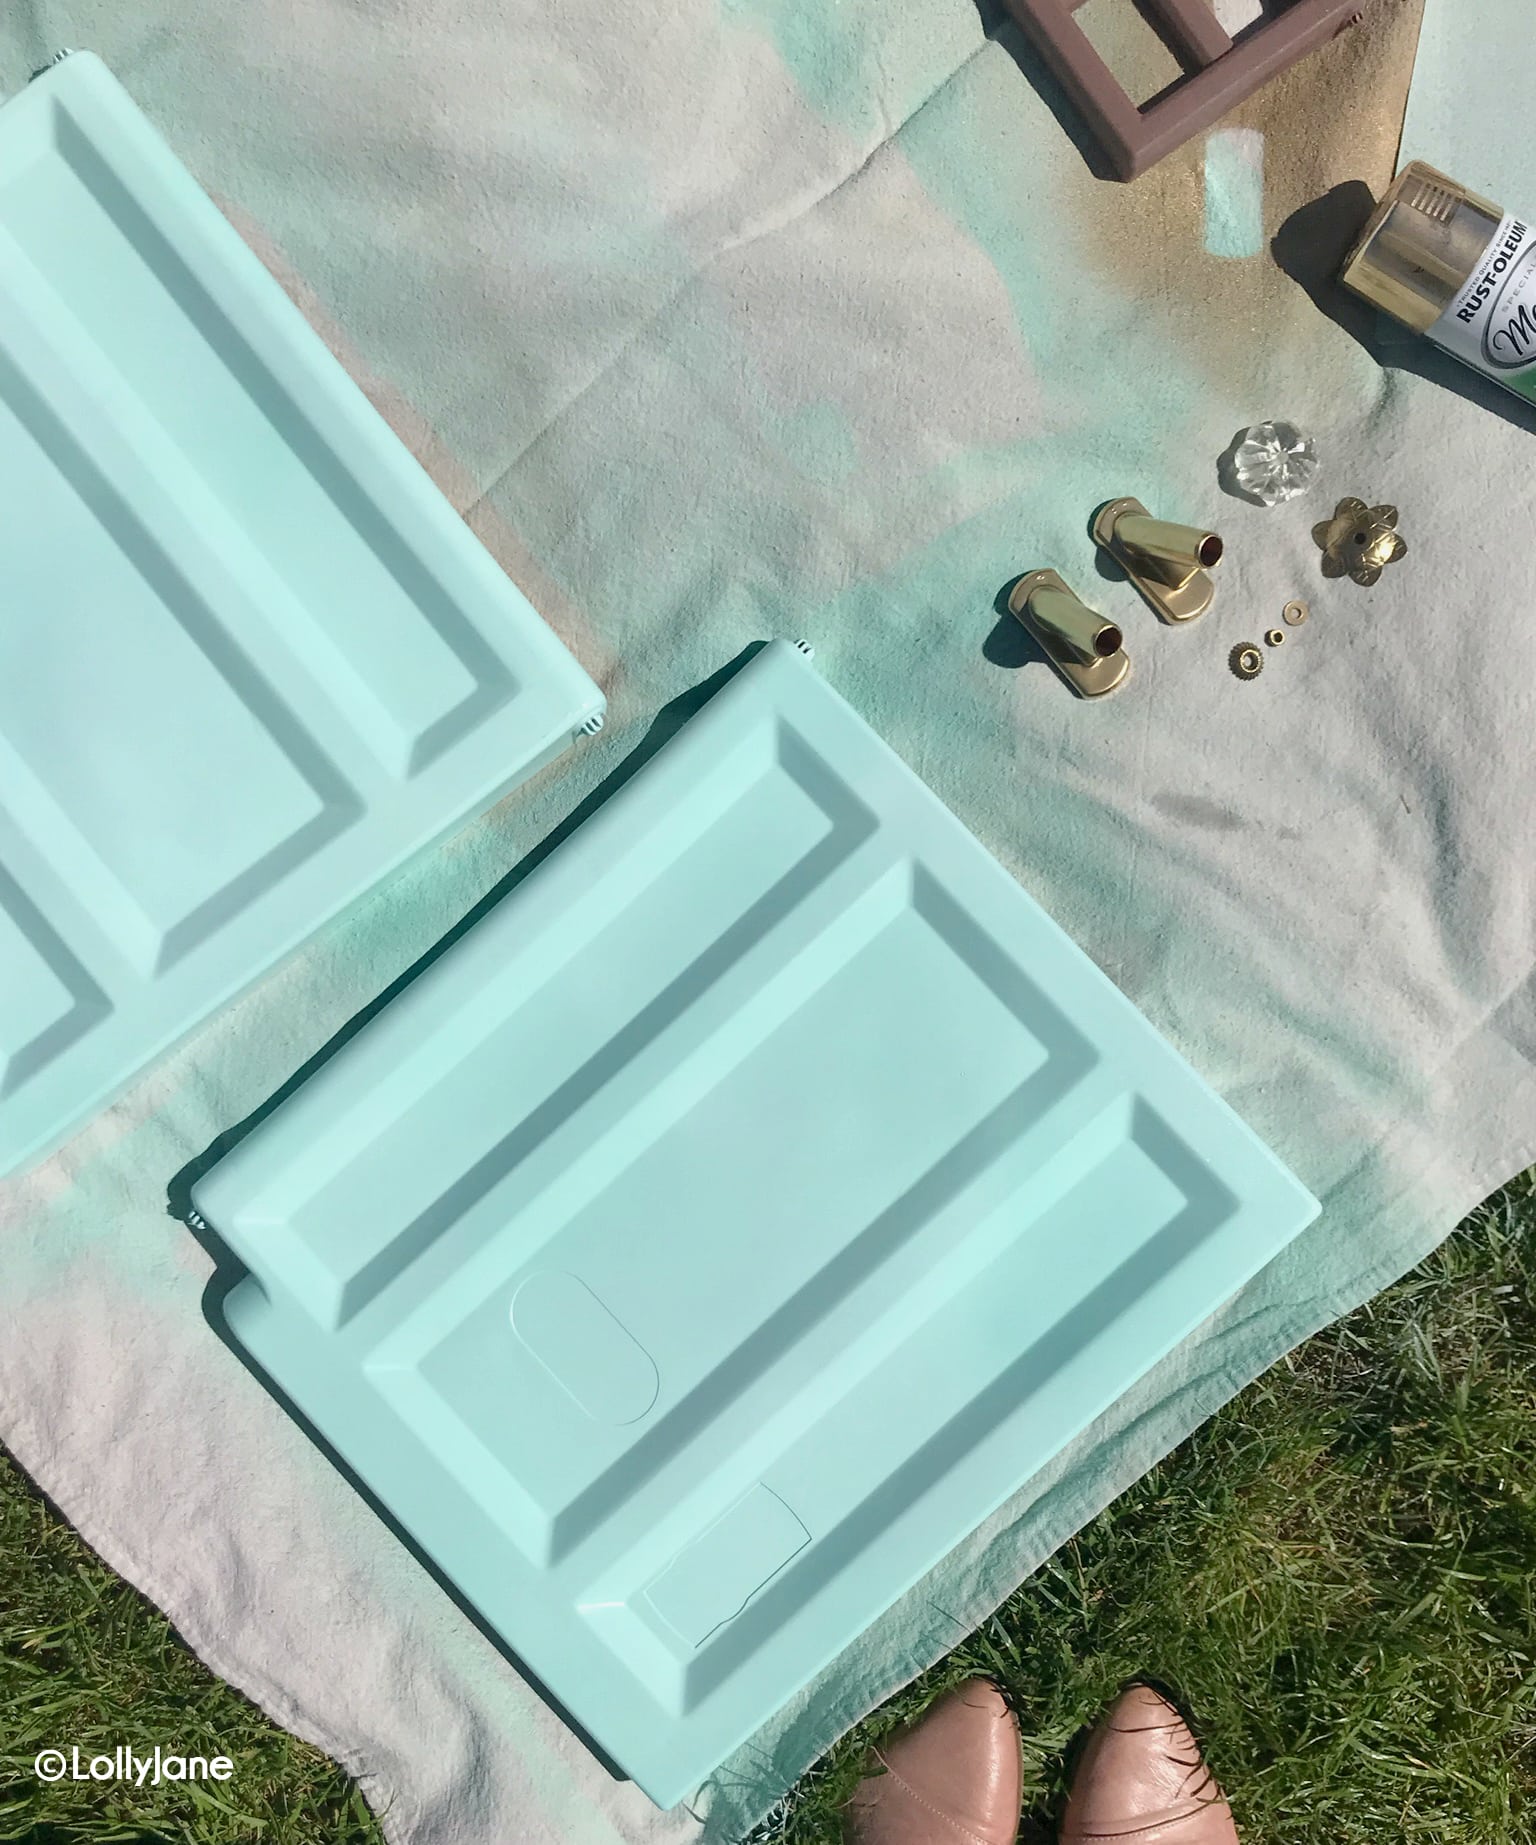
SPRAY PAINT. Once primer is dry, paint your pieces the color of your choosing. For this particular makeover, we spray painted the roof charcoal gray, the exterior (and interior) white, the door aqua blue, the shutters black then the flag pole and new knob gold, as pictured.
LET DRY FOR 24 HOURS BEFORE SEALING. After 24 hours of dry time, we spray sealed the whole house (2 coats) for added durability. We did 4 coats on the door as it gets the most use and for this particular make/model of a playhouse, the doors chip easily. Plan for a few touch-ups after putting the door on as it will likely rub off here and there despite 2 coats of primer, 2 coats of paint, and 4 coats of sealant. Dang doors!
ACCESSORIZE! Once all of the paint was sealed, we accessorized this cutie. We added a blingy cabinet pull to the doors vs. a traditional doorknob then drilled holes next to the doorway to hang a bell. Plop a flag in and you’re done!
Accessories to Dress Up Little Tikes Painted Playhouse
We couldn’t help ourselves when it came to accessories! We grabbed majority of these goodies at Target (throw pillows, toys, faux cactus, and layered doormats) but sources are below for the other fun accents:
- Glass Knob (Hobby Lobby)
- Metal Bell (Amazon)
- Home Mat (Target)
- Pink Rug (Target)
- Fake Cactus (Target)
- Dollies: Pillowfort Line (Target)
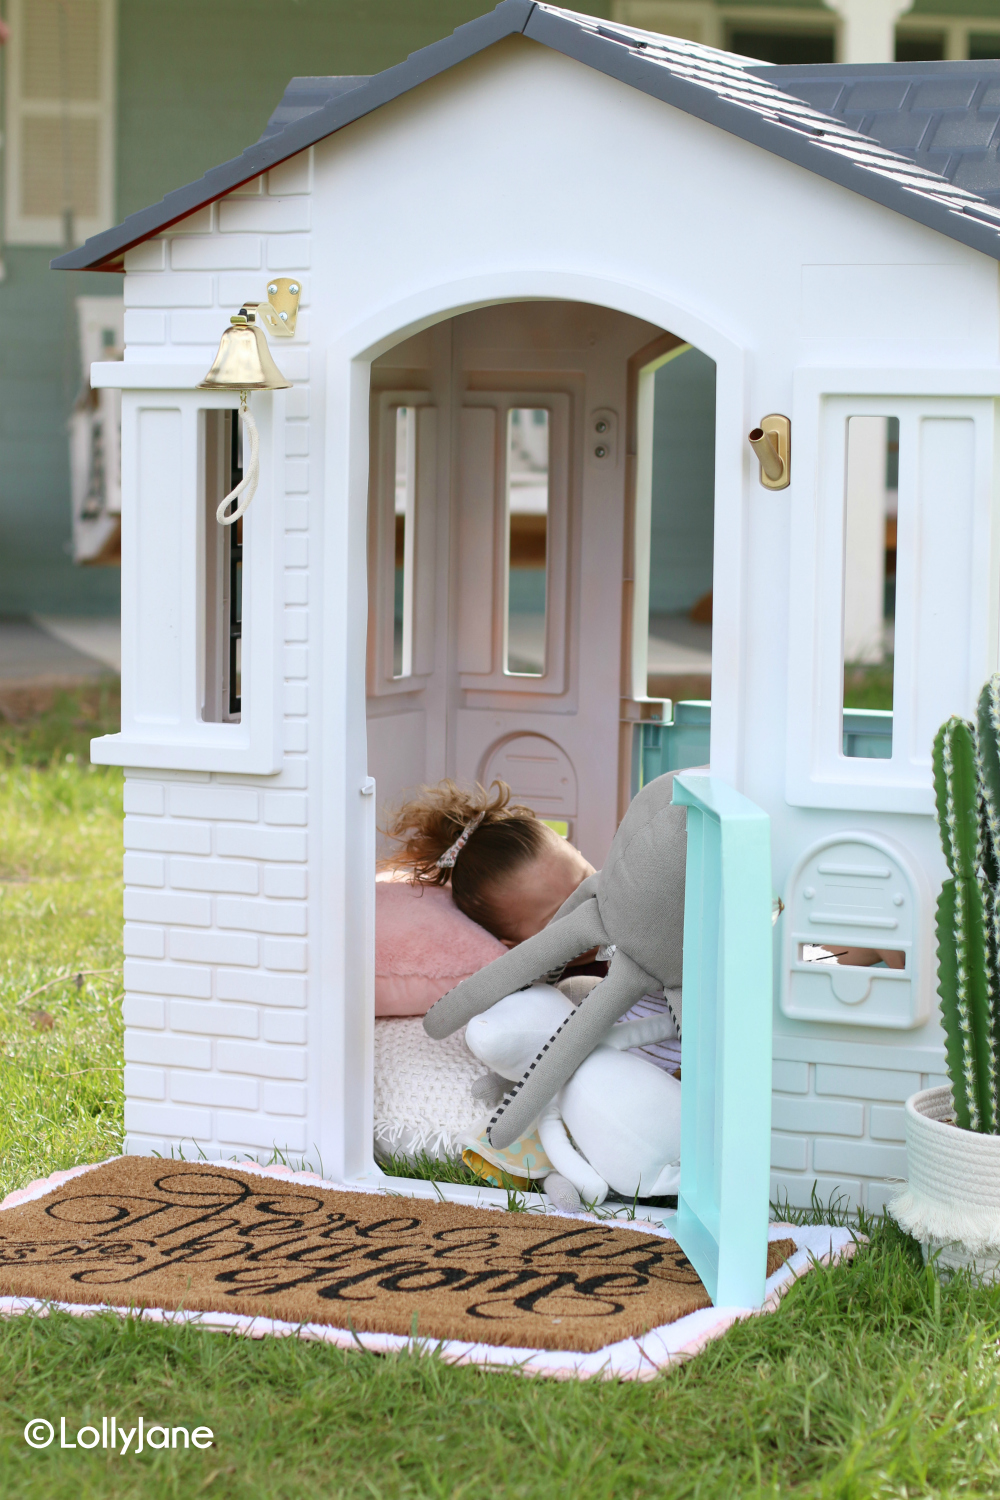
This little cottage is SO fun for kids of any age and a total must-have in your yard! Kristi’s 3-year-old was in heaven simply playing with dollies but the possibilities are endless… using the cottage as a post office with the mail slot, a lemonade stand with the open door to serve drinks and treats out of, or as a schoolhouse, and etc. It is nice to fill the growing imagination of little ones with this now stylish painted playhouse!

PLEASE PIN so your friend’s can dress up a plastic playhouse, too!
We are so grateful for the attention this little makeover has gotten… featured twice on Country Living’s Instagram was a total surprise and made our whole year! 🙂
View this post on Instagram
Can we get a full-size version of this charming playhouse?! ?#regram @lollyjaneblog
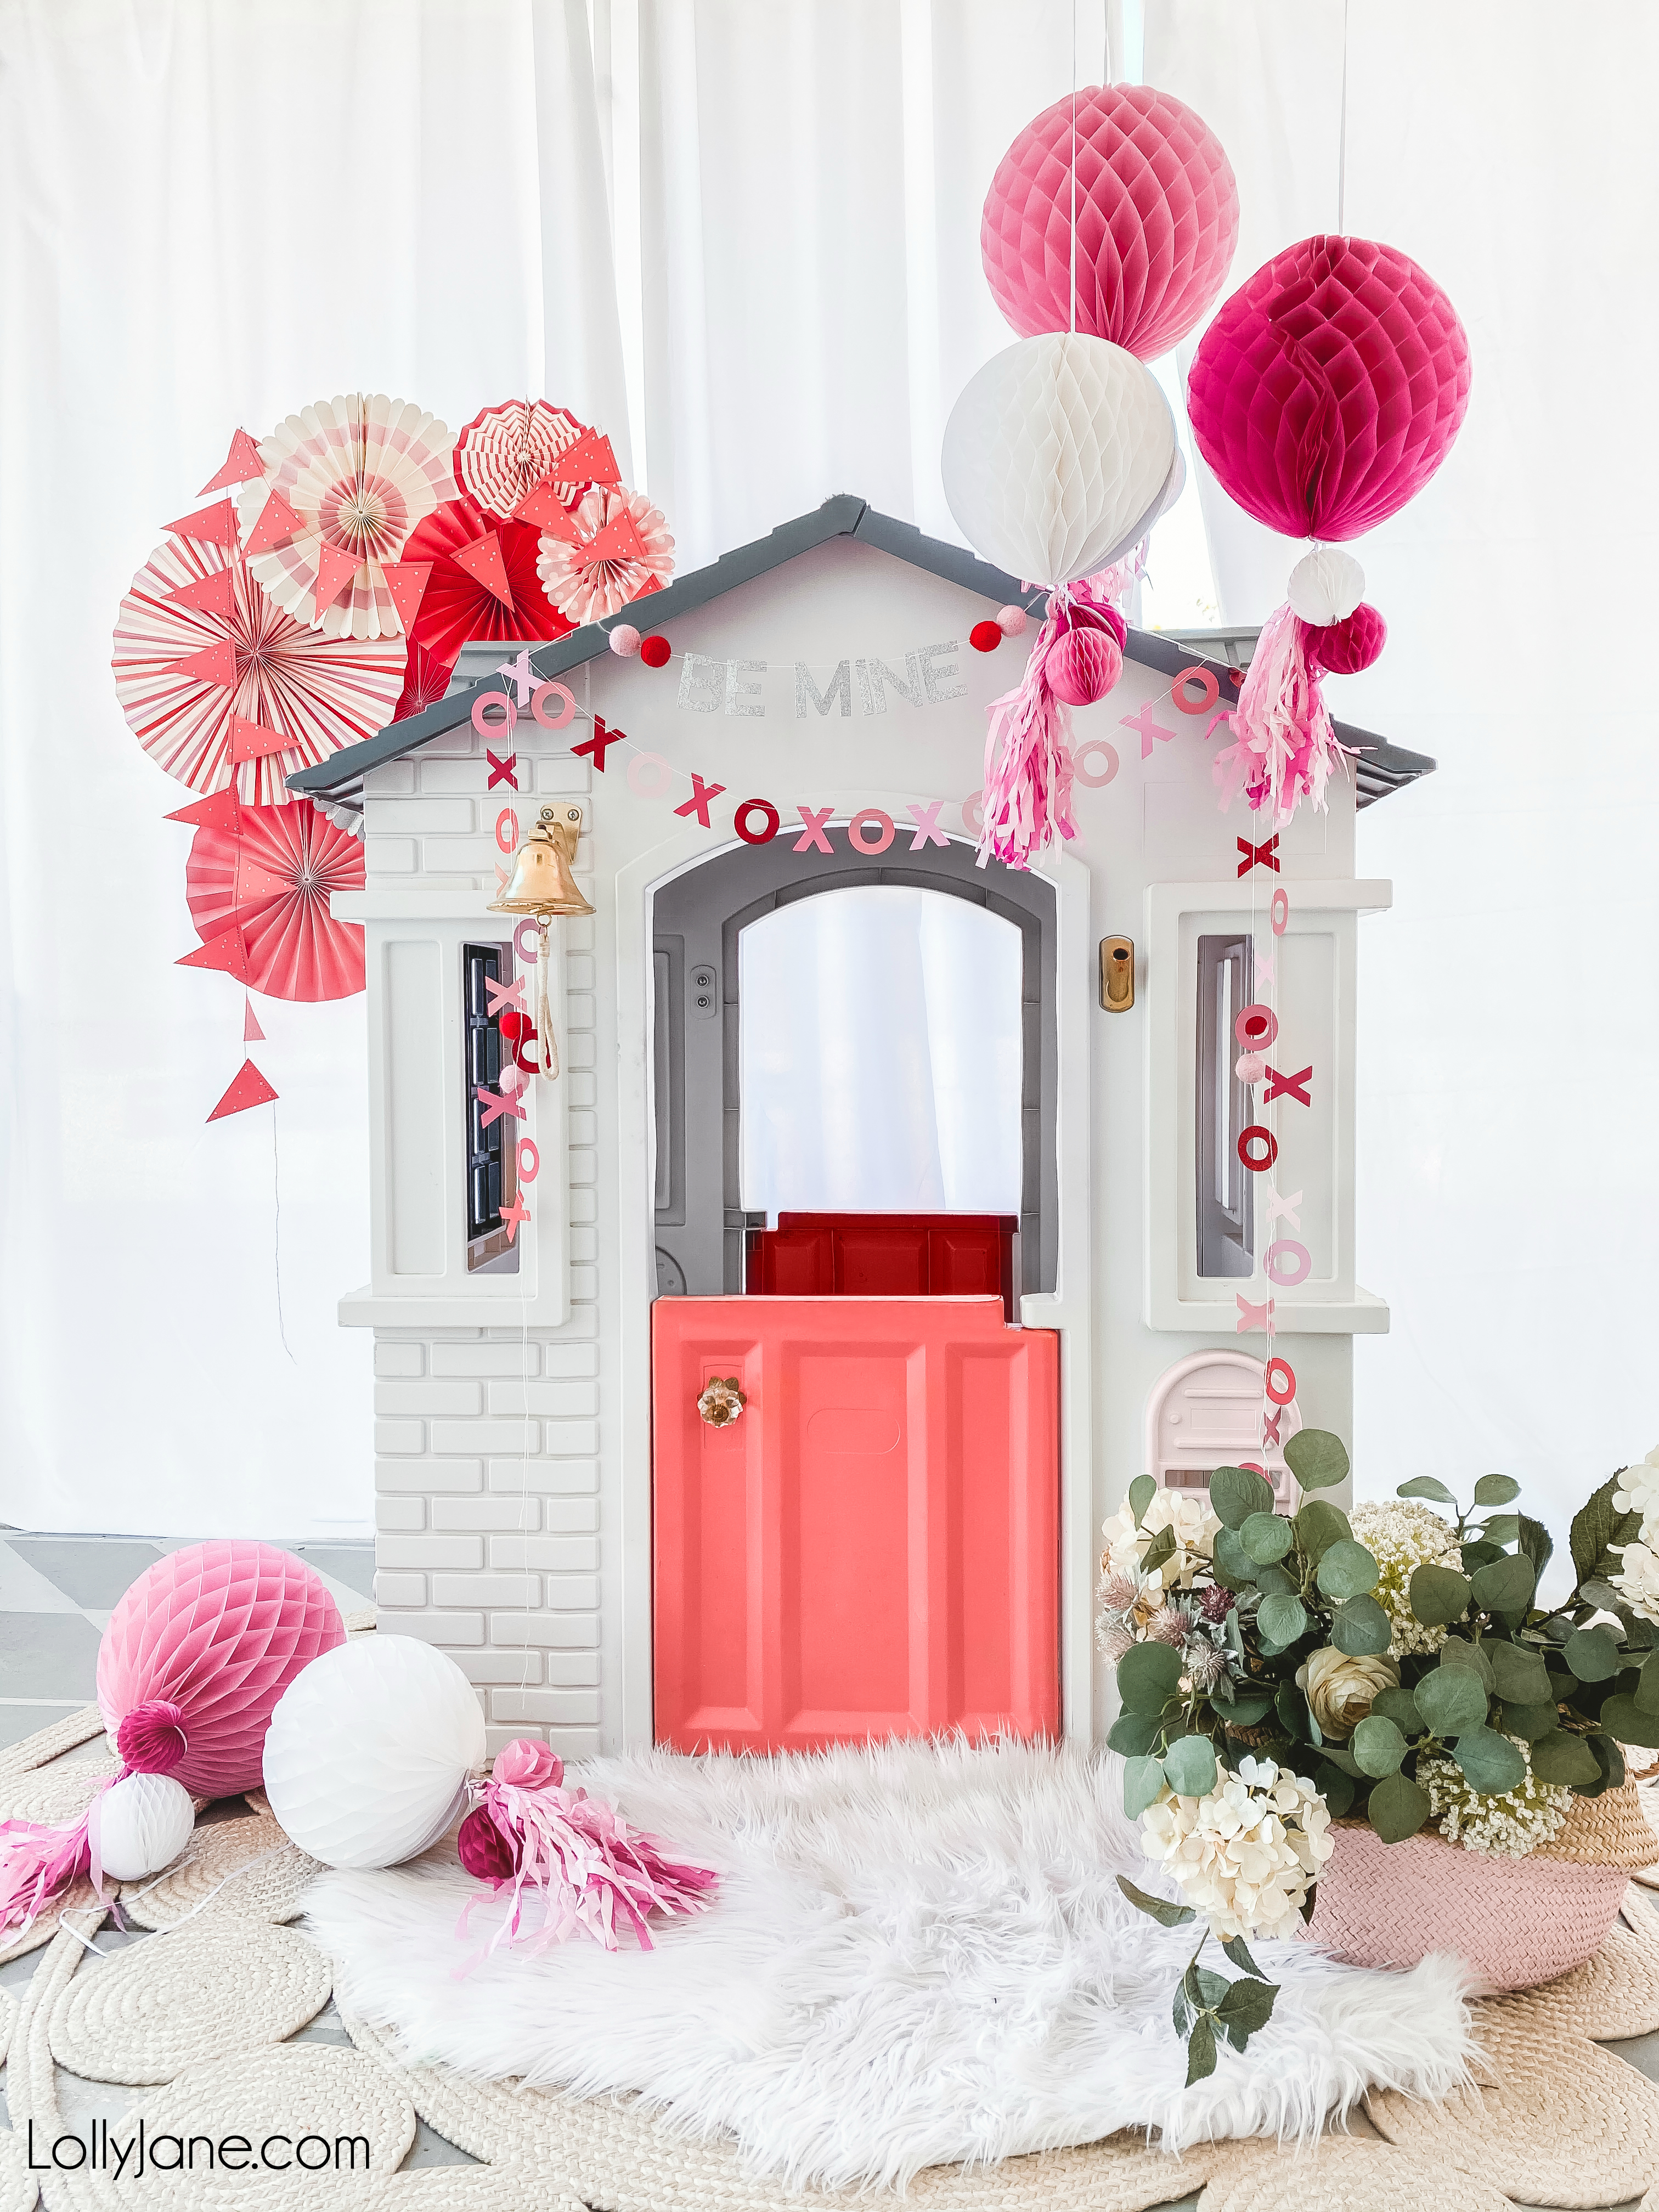
Here she is all decked out for Valentine’s Day… including a fresh coat of paint! (Cause you know, the door chips a LOT.)
We LOVE seeing your playhouse makeovers!
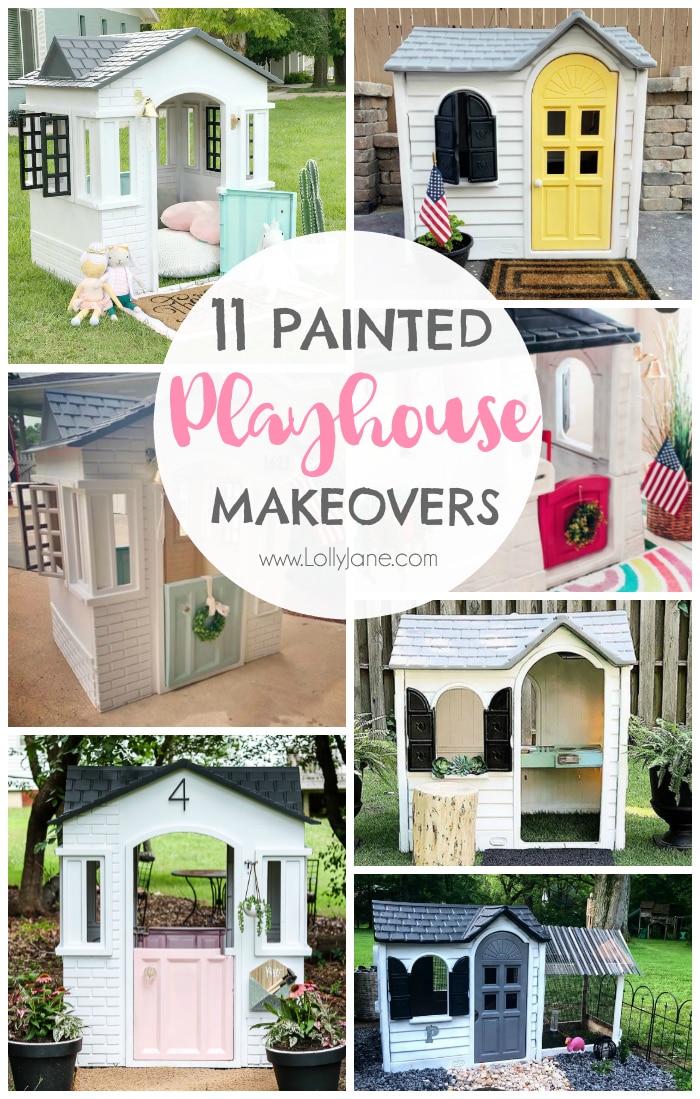
Here are just a handful of #littlelollyhouse knock-offs we are LOVING! Check out 11 More Painted Playhouse Makeovers!
Do what they did, tag us! Or be sure to leave a comment with a link so we can share!
You can use a blow dryer to remove residue or lemon essential oil!
Hi Tracy! This surprises us, so sorry! Did you sand it before and use plastic paint?
I used the same spray paint and it just sloughed off after it rained. Did you sand it?
Hi I have a question , my nieces playhouse is the same brand but an LOL collab, so the old decals that were on there are hard to remove I tried letting it soak and no results. If you have any suggestions to remove it fully that be great I scrapped as much as it off as possible already
Hi! Great question, the body has been great. The door was a little trickier and has needed touch-ups every few months, is all.
Just curious how this has held up over time- how often did you have to repaint it?
Hi Hillary! We haven’t. But if you do, make sure your paint says it’s meant for plastic 🙂
Hi! This is adorable!!! I would love to paint my Little Tikes table to match the house…..have you done this? Thank you!!
Aaah so sorry for the late reply! I’m sure you’ve got it done by now (yay!) but we just drilled it in. I’m sure your daughter loves it!! 🙂
Hi! How do I attach the cabinet pull for the door? Did you drill or glue? I’m almost done with my daughters! Woohoo!
Hi Stephanie! Ours came with this model but a similiar one is available via Amazon 🙂 https://amzn.to/3vUAaSb We just spray painted ours gold!
Hi! What is the “flag holder”? Trying to find something to hold ours
Hi Veronica! What an amazing bestie to give it a go for you! 🙂 There’s an easy fix BUT it’s time consuming… you’ll need to strip it and repaint with the paint made for plastic. I would use a power washer and you’ll see it flake right off. After it’s completely dry then you can reapply with spray paint made for plastic; as long as it’s kept out of the elements the paint should last a few years with minimal touch up’s. I haven’t painted many touch up’s other than the roof that my kids climb up on and chip off, lol. Good luck!
Hi! I’m absolutely obsessed with the play house. I showed my best friend this and she made one for my daughter. However she didn’t follow the directions of plastic paint and it’s peeling like crazy. I want to fix it, what/how do you recommend I go about it? Should I try to sand/peel off the other paint then go through your steps of painting? Thanks for your guidance!!!
Hi Alli! Yes you bet it will, happy painting! 🙂
I’m looking at using this method to “paint” my daughters plastic Step 2 easel. We will obviously tape off the white board and chalkboard portions. But for everything else, it seems like this process/methodology would work. Does that seem about right?
Hi Kerry! The inside has a light coat of white just to hide the original color 😉
Hi! I just started painting a playhouse like this for my niece! Did you paint the inside of the walls as well? Just curious if I should add this step ?
Thank you for the amazing idea! I can’t wait for my niece to see it and play in it!
Haha thanks Holly! Such a fun and easy makeover, just LOTS of paint! The slide is tricky since it’s more “high traffic”, I found 2 great posts you can reference to see how they did theirs and how it’s lasted over the years 🙂
https://homemadeheather.com/diy-painted-slide/
https://playgroundresource.com/how-to-paint-plastic-playground-equipment-fully-restore/
I want to move in! It’s so cute and charming! I’m looking to do a similar makeover on a bigger piece of equipment made of the same plastic material…mine has a slide, which I’m wondering about painting! Is the sealant enough to keep the slide slick enough to go down or do you think painting it would be a mistake? Thanks in advance for your insight!
Hey ladies,
I was wondering if you could explain how you disassembled the playhouse to paint it? I just bought it used and I’d much prefer painting it in pieces than trying to tape it off. After a quick once over, it wasn’t painfully obvious how to get there roof or doors off.
Thanks for any help!
Hi Monica! So sorry about that door… it is the absolute worst to keep paint on!! I’m not sure if it’s made from a different type of plastic, but we had a hard time getting paint to stick to it as well without chipping like crazy. We put it on then used delicate painter’s tape to tape off the door one last time and sprayed a few coats over the chipping areas. So far it’s held up with a few small chips but the most damage was done in attempt to put the door on. Once it’s all dry, be sure to seal with a clear acrylic spray which will help on the chipping. Luckily the rest of the playhouse paint has stayed put with 0 chipping, phew!
Hi Rachel! Did you let it dry completely? We haven’t had that issue at all, I’m so sorry for the hassle. 🙁 Ours even fell out of a moving truck and didn’t smudge or chip; the paint+primer in one (for plastic) by Rust-Oleum didn’t budge at all for us. Maybe it’s your climate? Did you paint in a dry area?
I can put you in contact with the folks from Rust-Oleum and they can trouble shoot with you. LMK!!! I am so sorry!
xo
Hi! Thanks so much for the tutorial. I attempted this and the door paint is already chipping even though I primed it. Do you know how to take the doors off to retouch? I bought it straight out of the box.
Hi! It doesn’t, isn’t that great! The paint we used it specially formulated for plastic 🙂
Very nice playhouse!
Doesn’t the paint peel off when they’re playing in it? As my daughter would open the door and windows a trillion times.
Hi,
I am currently using prime/ paint rustoleum paint on the playhouse. I’ve cleaned the entire house. I also sanded some parts but not all the house. I haven’t put on the sealer yet but I can run my nails through any part of the house and the paint comes off. Does the paint on your playhouse do that? Thanks!
Hi Lenny! We’ve updated the post to clarify: you only need to prime the door. Thanks for pointing that out. Good luck!! We’d LOVE to see your “after” 😀
Sorry! I’m confused. If using the Rustoleum “2X Paint and Primer” for plastic, are you STILL priming everything separately, prior to spraying the color or only priming the doors first with a can of just primer? The answers seem to conflict with the # of spray paint listed.
Thanks, Kati!
Thanks Lollyjane for the tag on here! I appreciate it more than you know! You’re amazing & your tutorial is as well! Thanks so much!
Hi Chanelle! Thank you so much!! Not a silly question at all; the can says to wait 24 hours so we had to say that to ensure the best results BUT we only waited an hour or so in between coats… making sure it is dry to the touch and not sticky at all 😉
Hi! This may be a silly question but do you paint/ prime one side of each piece and then wait 24 hrs and do the other side? Or do you just spray paint the whole piece? And also, when you say multiple coats, is that 24hrs in between each coat? Thanks! Oh and this is adorable and so clever!
Hi Ali!
That is exactly what we used as well 🙂 The only area I would prime (even WITH the primer included in the paint) are the doors since they get so much use. If you’re painting the same playhouse as ours (the Little Tikes cottage) the doors are made of a different plastic and they’re super slick and need a bajillion light coats of primer and will STILL chip a bit. Oy! LOL
The spray paint i purchased is Rustoleum’s 2X primer/paint. Do you still recommend priming it before?
Thanks!
You did a bang up job on the playhouse.
Hi Courtney! I’ll add that to the post, thank you for asking! We used 4 cans of white spray paint and just 1 for the roof and 1 for the doors. 🙂
Spray Primer: 4 cans
Body: 5 cans
Roof: 2 cans
Doors: 1 can per door
Spray Sealer: 2 cans
How many cans of paint would you estimate I need (each color)? This is SO. CUTE!
Hi Lisa! We took them apart before painting, just to ensure each area was fully covered 🙂
Did you take the house panels apart before painting or did you spray it while it was standing?
Thanks so much, Katarina, glad you like it!
This is so cute and I love that it’s for a noble cause! Love the gentle colors and great attention to details. The mat is gorgeous, as well as the note on it. Thank you for sharing this!