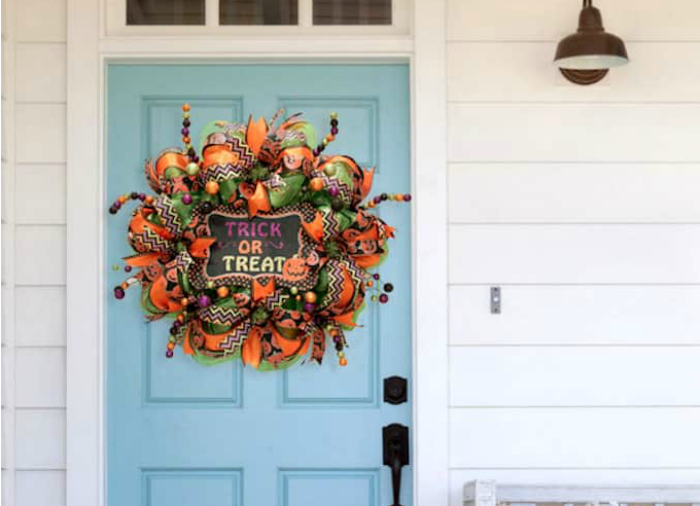
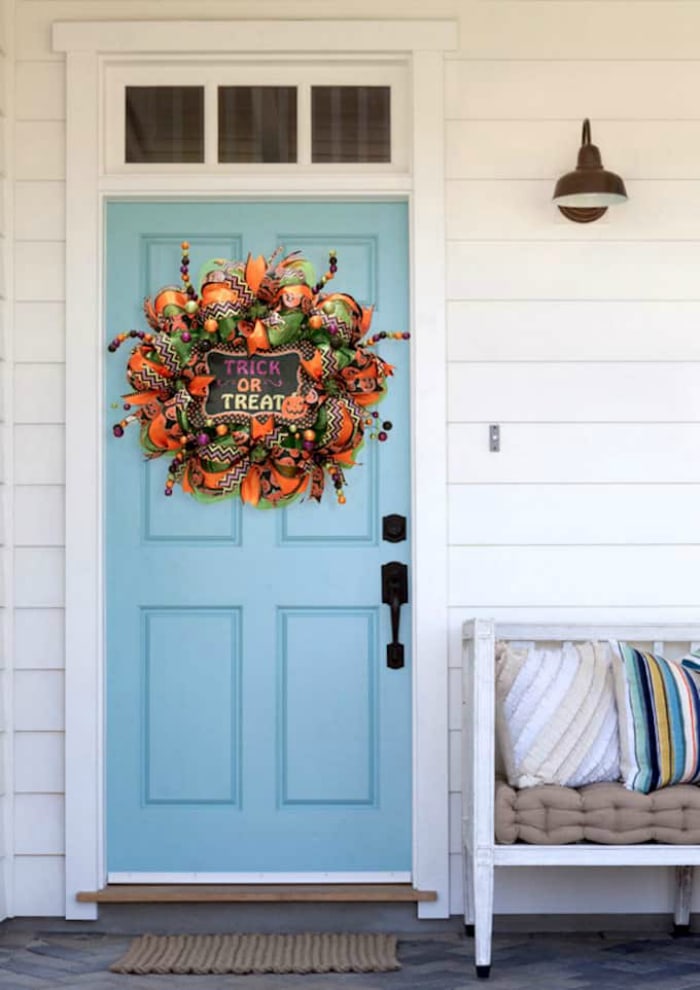
DIY Halloween Mesh Wreath
A combination of deco mesh, bright ribbons and glittery floral picks make this colorful DIY Halloween mesh wreath extra festive!
A combination of deco mesh, bright ribbons, and glittery floral picks make this wreath extra special. On Halloween night don’t be surprised if your house becomes a magnet for trick or treaters!

Hey guys! I am Bev and I blog at Round and Round DIY Wreath Ideas, where I craft and share unique DIY wreath tutorials. I am so excited to be here today to share a fall craft project – a festive Halloween mesh wreath.
pin this easy mesh halloween wreath

Supplies to make a Halloween Mesh Wreath
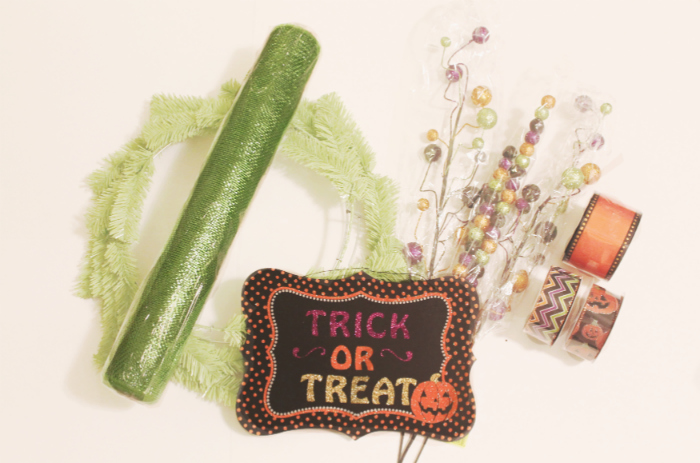
- 16″ Work Wreath Form
- 1 Roll of 21″ Lime Green Deco Mesh
- 1 Roll of 2 1/2″ ribbon (orange)
- 2 Rolls of 1 1/2″ ribbon (1 multi-color chevron, 1 black and orange jack-o-lantern)
- 3 Large Floral Picks
- Scissors
- Glue Gun
- Wire Cutters
See more Halloween wreath ideas
- Halloween Witch Hat Wreath
- Halloween Embroidery Hoop Wreath
- Addams Family Free Printable Art
- DIY Crow Stencil Mat
- DIY Bat Garland
how to make a halloween mesh wreath
Begin by gathering the end of the mesh and attaching it to the wire work wreath using the tinsel sprigs on the work wreath.
Start on the inside ring.
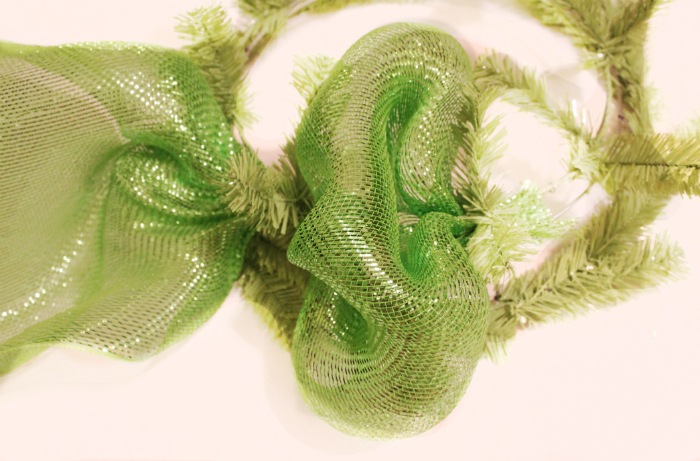
Once the end is secure, go down the mesh about 12 inches and gather it again and attach it with the next tinsel sprigs.
Continue this process around the inside ring and then move to the outer ring and repeat.

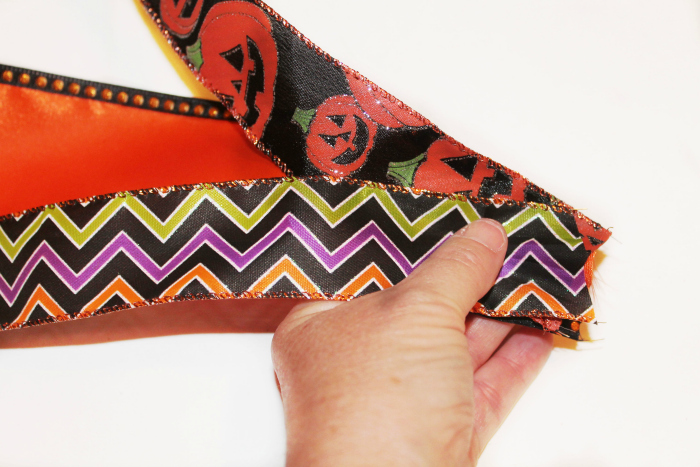
Now to add the ribbon.
Adding three at a time is a real time saver.
Take the three ends together and attach them to the wreath with the tinsel sprigs. Start on the outer ring.
Continue attaching the ribbon around the wreath, alternating back and forth from the outer ring to the inside.
No need to use every tinsel sprig. Skip over one each time.
This will allow the ribbon to lay more smoothly. And never pull the ribbons tight. Let them poof and lay loose.
I even rotate the position of the smaller ribbons as I move around the wreath. But that is an optional step.
Looking good, but don’t put that ribbon away yet! To give a frilly look to the wreath, cut a few 12″ pieces of each ribbon.
Then take one of each ribbon and pinch them together in the middle.
Now secure them to the wreath with the tinsel sprigs.
Add a set of ribbons everywhere you attached the first round of ribbon.
When adding these pieces over the top of the ribbon it is important to twist the sprigs in the same direction as with the first ones.
Let’s add that little sign. This particular one came with a wire attached for hanging on the wall.
That saves us a step.
Use your wire cutters and cut the wire in half. Use these wires and secure the sign to the wreath by wrapping the wire around the tinsel sprigs.
Make sure you position your sign so that the top corners align with empty sprigs so the wire can wrap easily around them.
Now we could stop here and you would have a really cute wreath, but who wants to stop at cute when you can have spectacular?
For that, let’s add sparkle. Take the large floral picks and cut them into smaller pieces.
Most floral picks will need pruning anyway so I usually just get large ones and cut them into multiple picks. This is typically more economical.
Depending on the pick, you may need to wrap the stem with floral tape once it is cut to hold the wires in the stem tightly together.
To attach these glittery accents, just add a dab of glue to the stem and tuck the stem down into the mesh. Add glitter picks all around the wreath to fill empty spots.
And now your festive Halloween wreath is ready to hang.
Thank you to Kristi and Kelli for having me! Best of luck crafting and Happy Halloween!
DIY Halloween Mesh Wreath
Materials
- 16" Work Wreath Frame
- 1 Roll 21" Lime Green Deco Mesh
- 2 Rolls 1 1/2″ Ribbon Chevron, Back & Orange Jack-O-Lantern
- 1 Roll 2 1/2″ Ribbon Orange
- 3 Large Floral Picks
- Scissors
- Wire Cutters
- Glue Gun
Instructions
- Gather the end of the mesh and attaching it to the wire work wreath using the tinsel sprigs on the work wreath. Start on the inside ring.
- Once the end is secure, go down the mesh about 12 inches and gather it again and attach it with the next tinsel sprigs.
- Continue this process around the inside ring and then move to the outer ring and repeat.
Adding Ribbon
- Take the three ends together and attach them to the wreath with the tinsel sprigs. Start on the outer ring.
- Continue attaching the ribbon around the wreath, alternating back and forth from the outer ring to the inside. No need to use every tinsel sprig. Skip over one each time.
- Let them poof and lay loose.
- Cut a few 12″ pieces of each ribbon.
- Then take one of each ribbon and pinch them together in the middle. Secure them to the wreath with the tinsel sprigs.
- Add a set of ribbons everywhere you attached the first round of ribbon.
Adding the Sign
- Use your wire cutters and cut the wire in half. Use these wires and secure the sign to the wreath by wrapping the wire around the tinsel sprigs.
- Make sure you position your sign so that the top corners align with empty sprigs so the wire can wrap easily around them.
Adding the Glitter
- Take the large floral picks and cut them into smaller pieces.
- To attach these glittery accents, just add a dab of glue to the stem and tuck the stem down into the mesh. Add glitter picks all around the wreath to fill empty spots.
- And now your festive Halloween wreath is ready to hang.


Oh thank you! 🙂
I love the wreath…