DIY | Home | Kelli's Home
Whiteboard Command Station
The hubs and I are always trying to coordinate our schedules with our 4 kids’ events. After missing appointments or not knowing where the other spouse was, we decided to get more organized hence our new whiteboard command station. Hubs really wanted a white board, “like a huge one, babe, at least 4 feet wide and like, 6 feet tall!” and I fought it, knowing it’d look tacky.
Here’s what I made instead:

whiteboard command station – home depot run
While grabbing supplies at trusty Home Depot for this project, Kris and I spied large white boards on clearance, just $5.50 for a 48″ x 52″ board. We were buying wood anyway so we grabbed 2 additional 8′ pieces of molding priced at $3/ea and I knew the hubs would be excited to help me assemble our “Command Station”.
That night I went to our son’s preschool orientation and was happily surprised to see the hubs had assembled the first step of the white board:

whiteboard command station – pick your spot
This spot in my house is just off the kitchen, the entry to the dining room. Perfect spot for our “command station”. While hubs was at work the next day, I hit nap time hard and finished up the project. I wanted to surprise him in return.
Here’s what I did…and I’m proud to say I [mostly] did it without my hubby’s help…he only trimmed out the white board, the rest was all me. [And can I just say I’m now in love with his brad nailer??-I was looking for new things I could nail together cuz it’s ridiculously fun to use!!] What was I saying? Oh yeah…
Okay I liked the hub’s simple frame idea okay, but it was just that…okay. It needed a chunkier look, to really fill up that wall. I knew I had a smidge of leftover trim from my board & batten treatment and luck provided the random 6″ x 5′ scrap wood in my garage. Score!
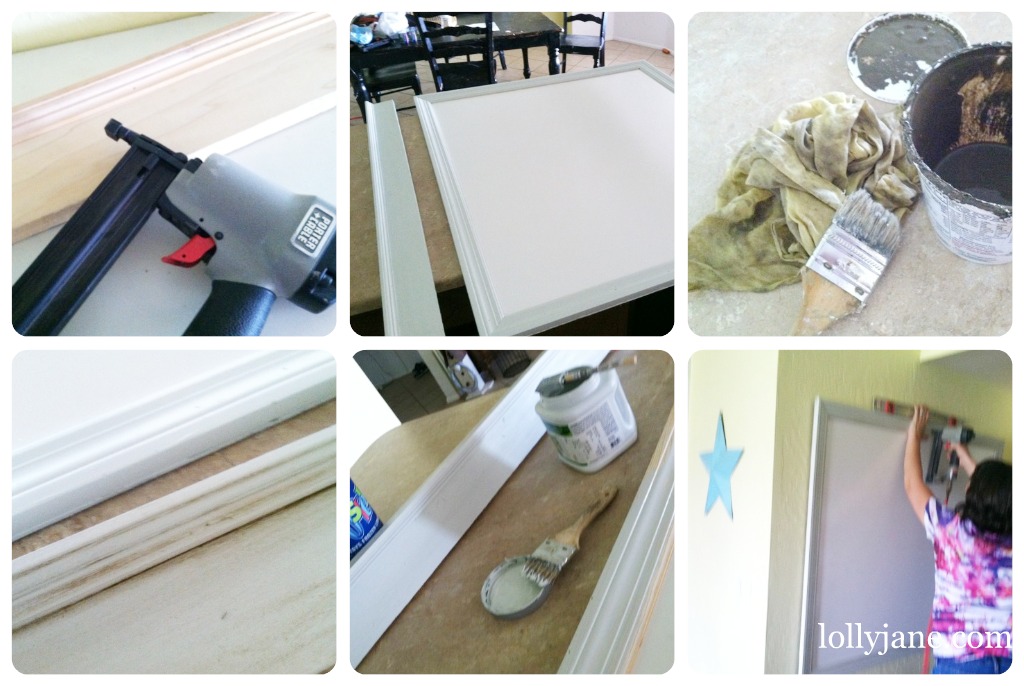
whiteboard command station – trim it out
I started out by brad nailing the trim to the piece of wood. Next step was painting the frame, wood/trim a blue gray color I had leftover from my front door [note to self, post the front door re-do!] then I glazed it all. I brad nailed the white board frame directly to the wall, did the same to the self-made molding underneath.
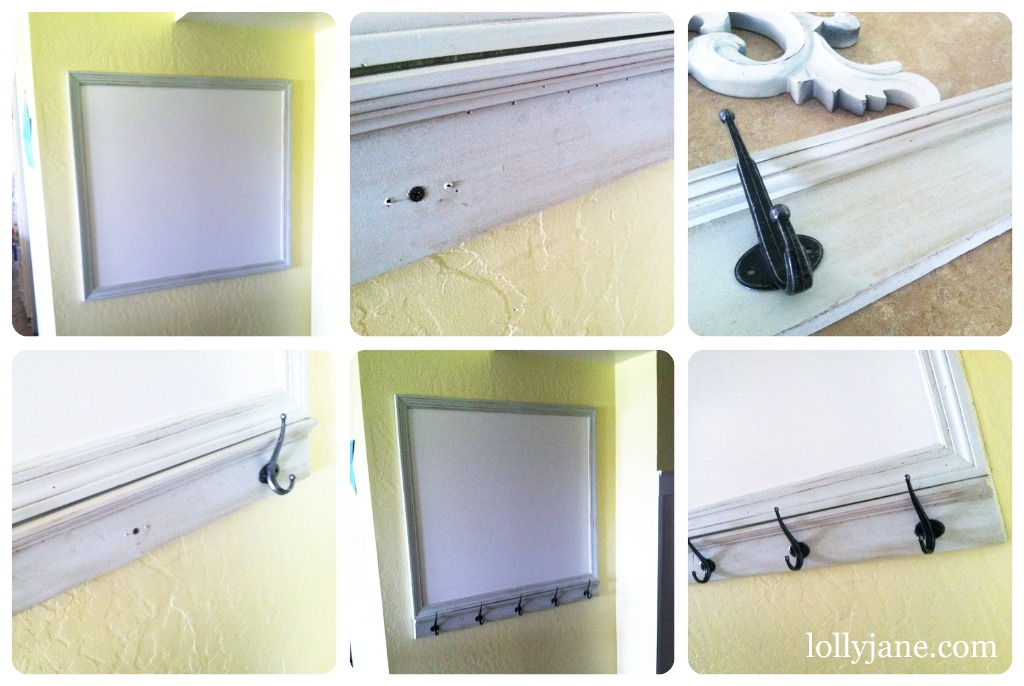
whiteboard command station – ikea hook set
I had the hook set from Ikea…although their furniture is cheap, they have the best organizational items and linens, I’ll give them that! Anyway, I was at Ikea a few weeks ago just for fun and grabbed 2 hook sets, one for swim suits for the kid’s bathroom & the other just in case since it’s a great price [$9.99 for 5 hooks!]. After I brad nailed the molding into the wall, I screwed in 5 more screws for extra strength for the future backpacks then covered the marks with the actual hooks. Camo duribility=awesome.
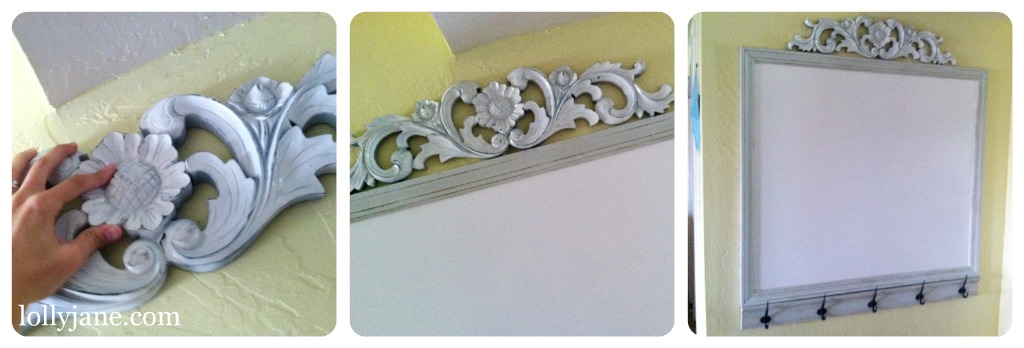
I had that swirly accent thing for years now, I just knew it would come in handy some day so I simply hung it with screws to top it all off. Love the finished product.
<div
style=”text-align: center;”>Cost for entire project: $5.50 for the white board + $7 for white board molding. Smokin price for everything the Command Station organization will do for our family of 6.
. . . . .

PS: Check back Wednesday for 3 full tutorials on how I created a dry erase marker storage plus a simple cork board how to.


Wow that was strange. I just wrote an very long comment but after I clicked submit my comment didn’t show up. Grrrr… well I’m not writing all that over again.
Anyhow, just wanted to say wonderful blog!
*DROOOOOOOOOOL* Oh my gosh, I have GOT to get my hands on one of those accent thingies! I never would have guessed you put that all together! *INTERNET HIGH FIVE*
just love it! I have an ugly white board that must now come down!!!
I LOVE this!! I am featuring it on my site today! Thanks for the tutorial!
That has to be the prettiest white board I have ever seen! I'm inspired! Thank you!
that turned out EXCELLENT!!!!! and i love the little marker storage on the side and the darling cork board frame. GREAT job sis!
It’s so pretty! I’m glad you didn’t go with the hub’s huge white board idea…
this is awesome. i need you to make me one!!
That is perfectly pretty!! And look how awesome you are for doing most if it 🙂
holy smokes kell! i leave town for 1 day and viola! 😉 turned out soooo nice! good job, partner! XO
I LOVE this idea!!!!! 🙂 Soooo super pretty and functional!!! 🙂
oh my heck! this is so cute, I want one!! 🙂
Ok, I love this…my hubby would probably change it too many times as far as erasing…haha we use outlook…haha BUT I might do this instead of a chalk board…hmmmm LOVE
Shana
ColorBlind
This is AWESOME!! We use a white board too, but mine is on the fridge and plain. I tried sprucing it up with vinyl words like "To Do" and Important Dates" but it looks tacky. I just haven't had a good idea on how to make it decorative. Now I do! Thanks. 🙂
I LOVE LOVE LOVE it!!! If you come to my house sometime, you MIGHT just see the EXACT same thing in my office! haha! I'm such a copy-cat! XOXO!!!
I love how you glammed up this white board! Great project!! 🙂
I absolutely love this! A lot of the time I feel like we need a command station for our home, and we don't even have kids yet! Oh, life is crazy. But really though, adding the molding and hooks is so smart! I love the paint color too. Can't wait to see your door redo!
Love. love. love. So flippin' cool!!