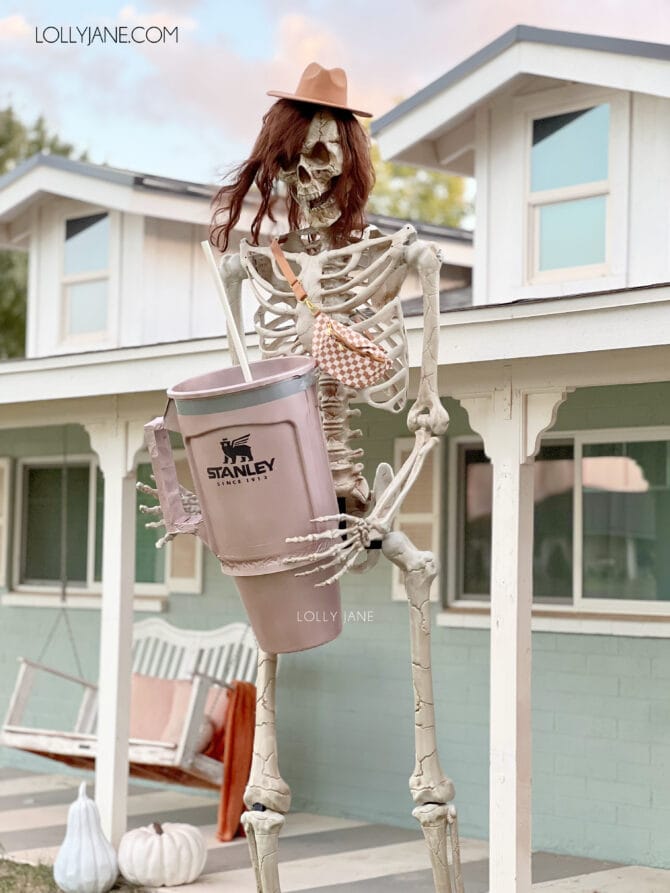
DIY Stanley Quencher Cup
DIY Stanley Quencher cup, the perfect accessory to your 10′ skeleton to display at Halloween, to use as a costume or just to enjoy in jumbo form!
Want to make your favorite Stanley Quencher Cup life-size? We gotchu!
What is a Stanley Quencher Cup?
Unless you’re living under a rock, Stanley quenchers (or Stanley cups and no, not hockey!) are all. the. rage. this year. They’re popular due to how long the ice stays frozen (a must for Phoenix living) and for the variety of fun colors and accessories you can dress them up with to personalize and make it yours. Buy directly from Stanley for the latest seasonal or limited edition colors/designs but we’ve found that Dicks Sporting Goods has the best in-stock selection overall. (The hot pink Stanley is my fave!)
Materials to make a Stanley cup
Not surprisingly, I gathered most of the materials to make our jumbo Stanley cup at our local hardware store. Note: post may contain affiliate links. Thank you for supporting our small biz!
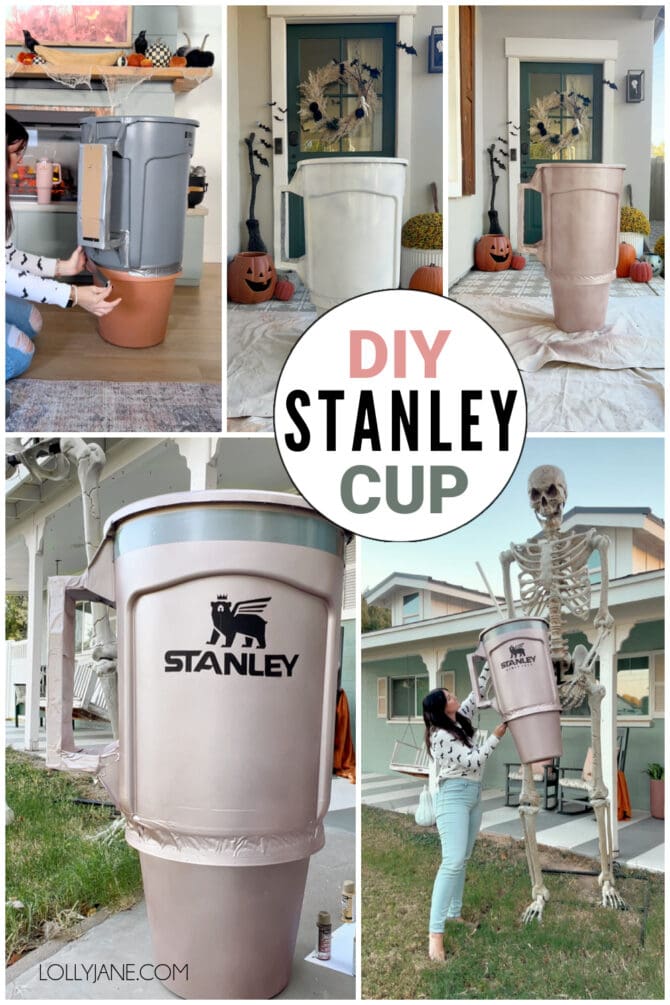
- Garbage Can (body of Stanley) + Lid
- Planter (base of Stanley)
- Silver Duct Tape
- Cardboard or Cardboard Boxes
- PVC Pipe (straw)
- Printer paper (Stanley logo)
- Spray Adhesive
- Spray Primer Paint
- Spray Paint, color of choice
- Hand saw or electric saw (to cut off handle)
Making this jumbo Stanley quencher cup was a breeze! Additionally, I was able to put it all together inside while watching a Hallmark movie (minus the spray paint!) So easy and fun, love how it came together!
DIY XL STANLEY CUP
Project time was less than an hour (aside from shopping + paint dry time.)
- Remove one handle from your garbage can, don’t toss it!
- Place handle upside down and adhere to garbage can near the bottom. (See video for visual.)
- Cut cardboard up in pieces to create a “handle.” I just winged it and duct taped here and there until it was shaped like a Stanley handle, securing pieces to the garbage can. Note: handle is just for looks!
- Secure planter to garbage can using duct tape. Feel free to get fancy using other material(s) for a smoother look. This mom has 3 kids to get ready for Halloween and my skelly doesn’t care about the tape wrinkles. 😉 This is when it starts to take shape and look like a Stanley cup!
- Drill hole (or use screwdriver to poke a hole) into the bottom of the garbage can for the pvc pipe to drop into planter, (“straw.”)
- Cut pvc pipe/straw to size if need be, (I cut 6″ off of mine.)
- Spray primer over garbage can/planter/handle and be sure to coat the lip of the garbage can and a few inches inside.
- Once primer is dry, spray paint color of choice (I used metallic rose gold to match my Stanley cup, so many fun options!) Note: Let paint fully dry before installing on skelly to avoid smudging or paint transfer.
- Add straw into Stanley.
- Cut out Stanley logo (yes it’s tedious but worth it!) then secure to jumbo Stanley cup with spray adhesive.
- Once logo is on, spray sealant over to prevent letters/logo from lifting.
- Optional last step, use a drill or screwdriver to create 4 small holes (2 per zip tie) and secure to skeleton.
- Also optional: dress your skelly up! We added a checkered crossbody bag, wig and signature influencer style hat. Haha
Skelly is just as stylish sans the wig, crossbody and hat right! Rest assured he’s parched no longer this Halloween season! 😉
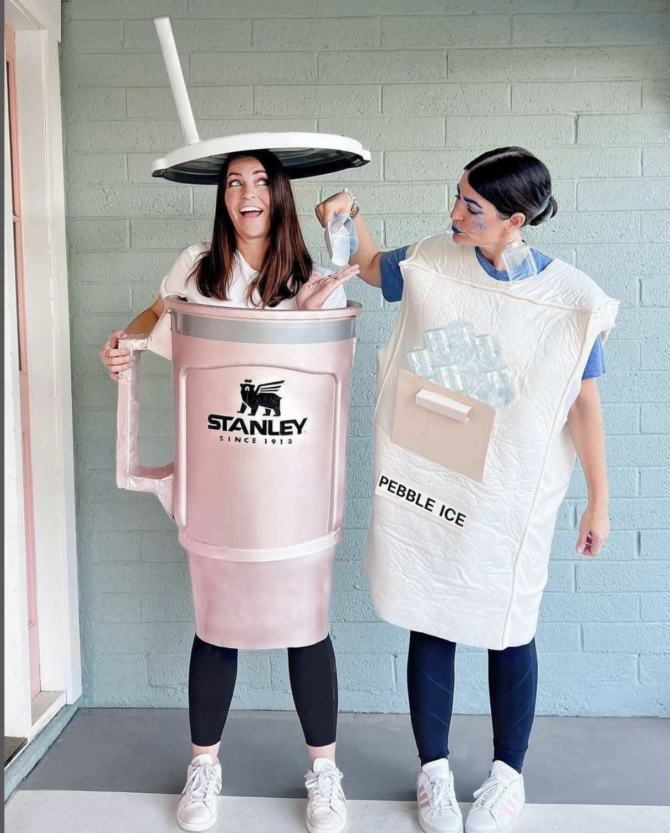
DIY Stanley Cup Halloween costume
If you want to make this a DIY Stanley Cup Halloween costume, we covered that as well! Kelli wore the Stanley and I was its sidekick: a pebble ice maker! Hahaha (We LOVE twin costumes, see all of ours here.)
Simply spray paint the lid of the garbage can and add a paper straw. Cut the bottom of the planter off then squeeze into the costume through it. (It’s likely a 2-person job!) We used a rolled up poster board but you can spray paint 2 paper towel rolls, tape them together and paint the color of your choice. Use what you have on hand and be creative! Lastyl, to secure, we duct taped it on then added touch up paint. That’s it! Happy Halloween! 🙂