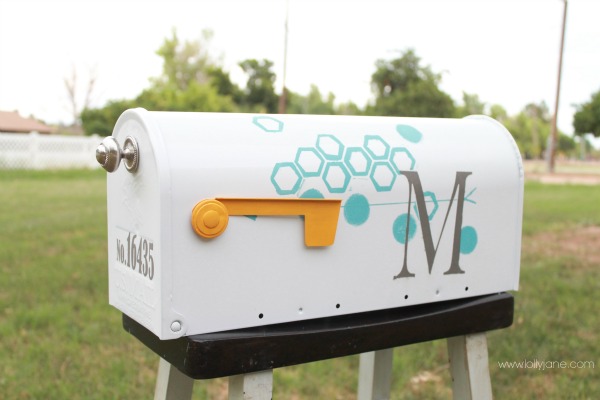
Mailbox makeover
My house is only a few years older than I am. I know… ancient, right? (; The mailbox is original to the house which means it’s survived hot hot hot Arizona summers for 30+ years and let’s be honest, is in pretty bad shape. (Like, really wobbly and on the rare occasion that it rains, my mail gets soaked.) When asked by ScotchBlue™ Painter’s Tape and The Home Depot if I would like participate in the Ready, Set, Paint event (pairing up with a very talented group of bloggers) on the challenge of a DIY project using painters tape (in my case, a mailbox redo,) I quickly replied, “Heck yeah!”
 and
and  if I would like participate in the Ready, Set, Paint event (pairing up with a very talented group of bloggers) on the challenge of a DIY project using painters tape (in my case, a mailbox redo,) I quickly replied, “Heck yeah!”
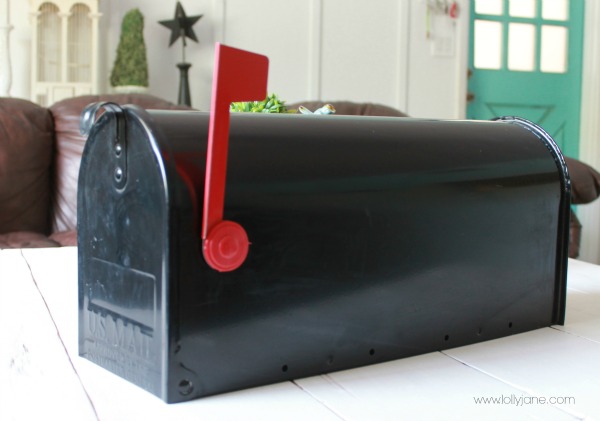
Okay… so I didn’t exactly say that because that’s not very professional BUT, I was excited to finally check something off my to-do list! Best part? I spent very little money on this redo as my cute next door neighbor took pity on my shabby mailbox and simply gave me a new one… um, about a year ago. Yes, my adorable next door neighbor dad GAVE me a brand new mailbox, which sat in my garage for a year. What’s wrong with me!? LOL! (Life of a blogger, much?) Well without further adieu, here is the new mailbox with its makeover complete. Do you dig it?

I started with a new-but-dusty-and-slightly-knocked-around-from-sitting-in-the-garage-too-long black mailbox, as seen here.
But this boring black box is already a step up from my current condition… want to sneak a peek? (Don’t judge!)
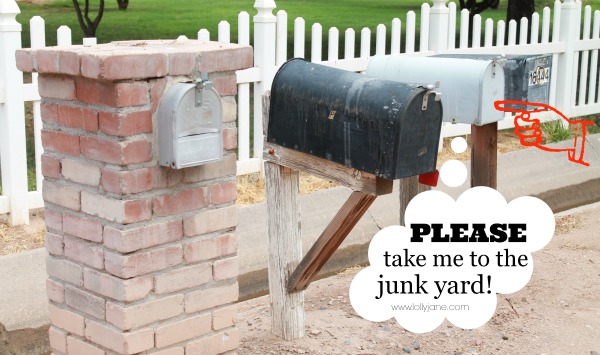
Okay wow, ALL my neighbors need a new mailbox. And new posts. Hmm, I think I’ll surprise my brother (across-the-street neighbor) with a new mailbox as well, sheesh! We’re all acreage homes so what do ya do? Anywho!
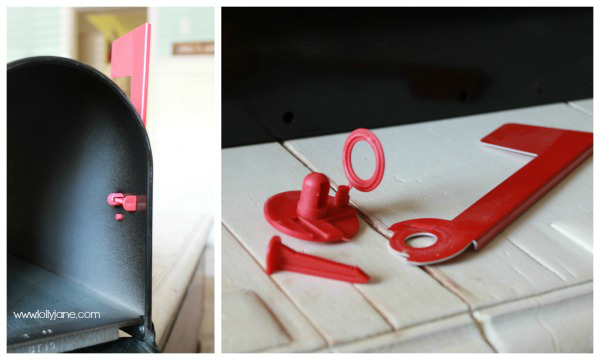
First up, remove the flag from the mailbox so you have a clean slate. A standard mailbox will have a plastic pin inside that you simply pull out. Save your arm strength for the next step…
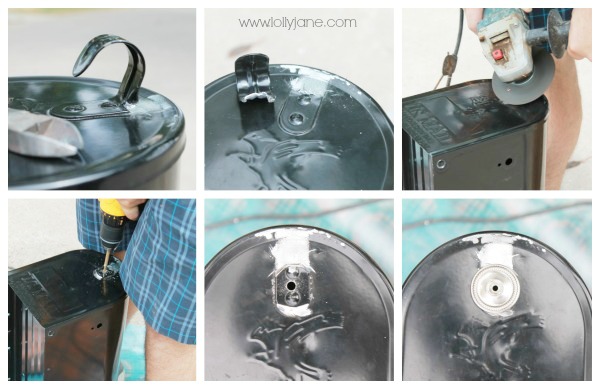
Here’s where your biceps enter. See that handle that opens and closes your mailbox door? You don’t want to remove it all the way because on the backside is the latch that keeps it securely shut. So use your pliers and muscles to snip snip snip the top away. UNLESS you’re my husband who informed me after the fact that my handy dad next door owns a grinder. *Palm hits head, muscles mad at me* Grind off the little pieces sticking up so it’s flat. Note: Wear your safety goggles as there will be sparks! Then use a diamond bit and drill a hole through the center of the old handle. See the right lower pic? That’s the new pull in its place. I picked it up at The Home Depot for less than $5 and I love the plate that comes with it that sits in front of it as it hides my mess perfectly! Muah hah hah! (;
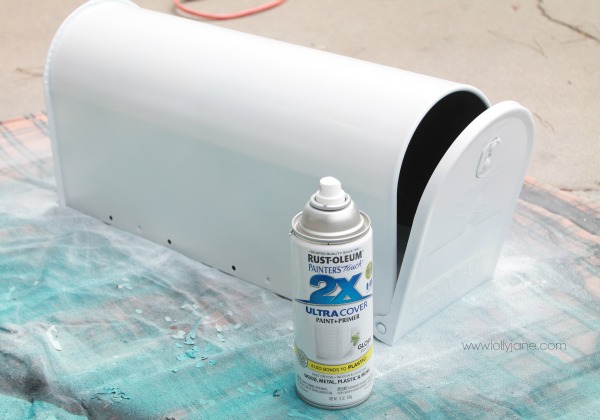
Give it a coat of your base color. I chose Rustoleum’s 2x paint + primer… time saver! Just your standard white spray paint in a gloss finish.
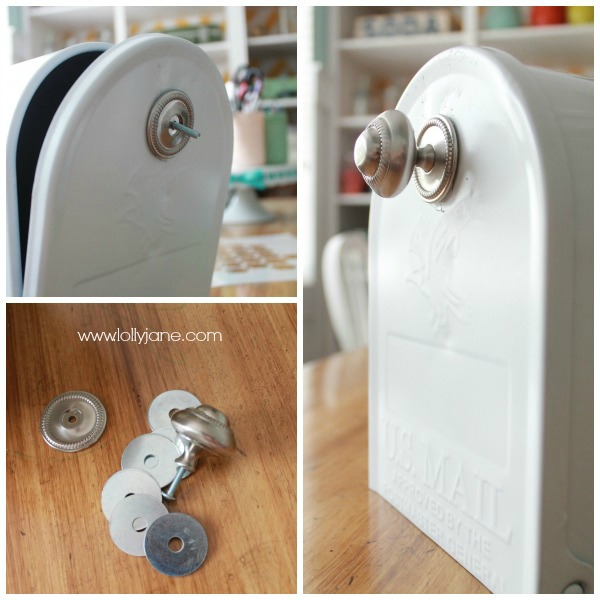
Because pulls come sized to fit a standard cabinet door, the screw is reallllllly long. And because I didn’t account for this when I was at The Home Depot (and didn’t want to make another trip,) I simply shoved a bunch of washers behind the screw (inside the mailbox) to make up for the space. Problem solved! LOL Then I screwed it in, nice & tight. Gosh, don’t you already just love the custom look? Only $5 and gives it a huge statement!
Okay so now to spruce up the flag….
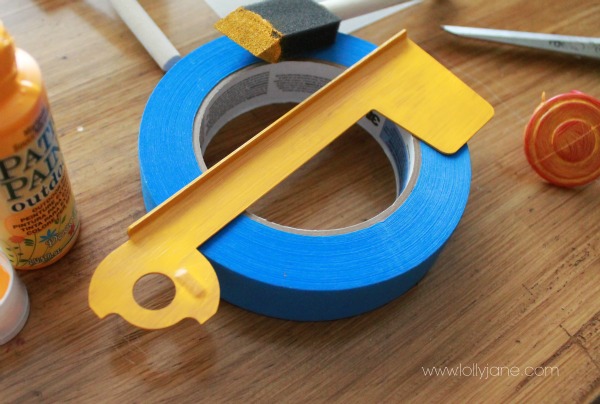
I wanted to give it a fun pop of color and since my fav hue is yellow, I already adore it! I used outdoor paint to withstand the weather and I’ll also give it a coat of poly to seal the deal. (Pun intended, ha!)
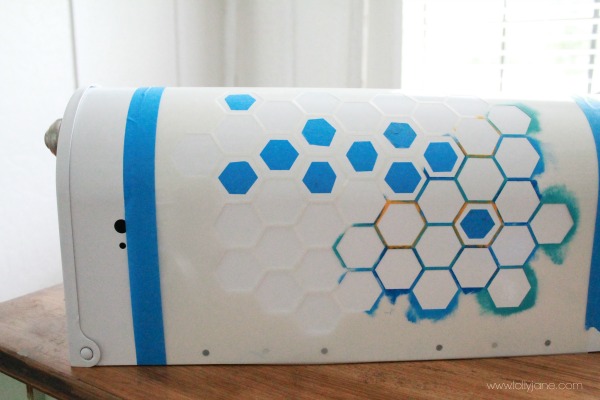
Here’s where the fun begins! Start by taping down a stencil. This stencil is from Royal Design Studio and was a freebie from the 2012 SNAP blog conference. I wanted to copy the darling Rhonna Farrer’s app design because it’s so cute and is a timeless look. This mailbox has to last at least 30 years, right? (; We recommend ScotchBlue™ Painter’s Tape because it holds the stencil very tightly but won’t peel off the fresh paint. I only allowed the paint to dry for a couple of hours in between errands and this tape didn’t rip off a speck!
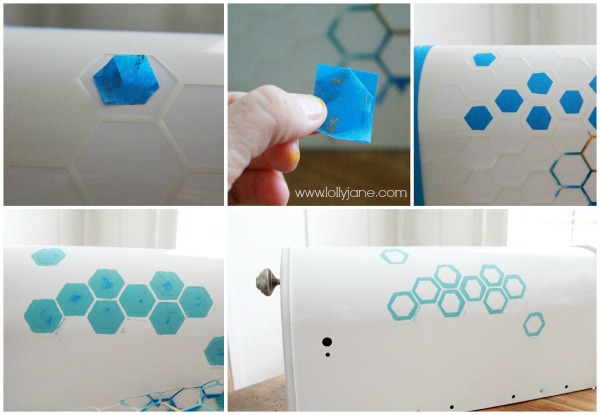
This step is slightly confusing but worth it. So, I wanted the octagons to be hollow so I used ScotchBlue Painters Tape to mimic the octagon. I made a sample octagon by cutting and laying a few different pieces of tape until I got the shape I wanted. Then I laid my sample back-to-back on a new piece of tape so they wouldn’t stick (pic 2) and cut around the new shape. Then I placed it inside each octagon and painted around it. That’s it!
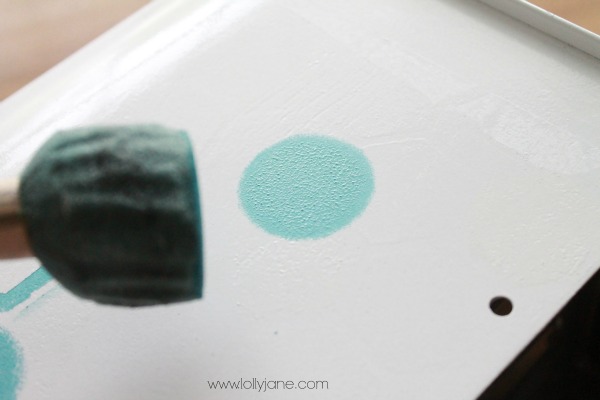
Using a circle foam sponge brush from my local craft store, I sponged on a few circles in random places.
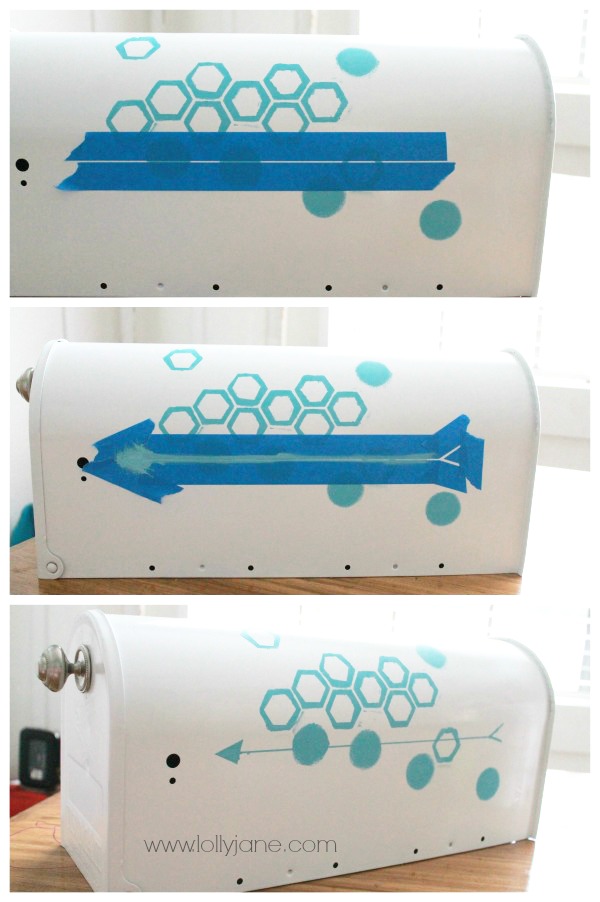
To create an arrow, I placed 2 pieces of tape where I liked it, made an arrow head and small tail and painted inside. So easy and no leaks!
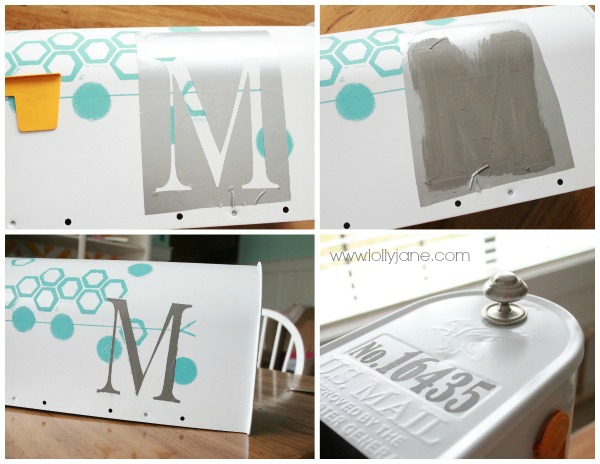
This is where owning a vinyl machine comes in handy. I used mine to create an “M” for my last name and house number, (Bell MT font.) I then painted the insides gray to match the custom pull and just lovely love love how it all came together.
Do you like my bar stool stand?! JayKay! Next up is replacing the old wood mailbox post. I’ve already purchased my secret weapon from The Home Depot to make it stinkin’ cute so stay tuned! Oh, and if you loved this project, you’ll want to be sure to check out all the other creative talent at the Summer DIY Blog Hop taking place at Centsational Girl’s blog!
This project was brought to you in partnership with The Home Depot and ScotchBlue Painter’s Tape. Follow along!
This is really cool! Who knew mailboxes could be beautiful?
Hi Michelle,
We used the old existing wood post. Thanks for stopping by! 🙂
What did you use for a post for the mailbox?
Thanks for sharing an informative article.
Thanks so much! 😀
Very Nice and Fabulous.Thanks
thank you for this motivation to get my mailbox looking awesome! It has needed some TLC ever since we moved in. Oops! 🙂 We have lots of summer projects in store this year. One big project I’m excited for is redoing our backsplash in the kitchen. We were thinking of doing it either in a chalkboard backsplash or this awesome pallet backsplash I found the other day. So fun accomplishing projects!! 🙂
http://www.remodelaholic.com/2012/03/how-to-install-a-pallet-wood-back-splash/
Haha! Our old one was pretty ugly! Thanks so much for stopping by and for your sweet words!! 🙂
I like the checkerboard table! (http://www.dreamgreendiy.com/2013/06/24/bloggers-hop-game-table-featuring-scotchblue/) If I try it, I think I’ll have to make something to hold the pieces when not in use, or they’ll be everywhere.
Okay…. so…. I admit that we just bought our house a year ago, but our mailbox looks worse than your original one. I am SO inspired to either give it a makeover or to buy a new one and make it this cute!!! Thank you SO much for sharing!!! Honestly, this has been my favorite project that I have found this summer so I would link back to you!
Love this mailbox! Sharing on fb today!
Super cute mailbox. I have never seen one like it! Nice job.
And to think I just spray painted my faded mailbox black. And the neighbors. What was I thinking?!?! Hanging my head in shame -sigh
How did I miss this fabulous-ness? We have a community box, too, but I can still love yours. What a fun little “hop” you were apart of;)
Oh man, our mailbox is so gross…’cause it gets moss on it here! Probably not a problem you have 🙂 I’ve been dying to make this headboard forever…not specifically a summer project, but it will be easier to make now than when it starts raining again! http://www.sweetfrenchtoast.com/2012/03/05/how-to-diy-barn-door-headboard/
I love your mailbox, I really need to redo mine too.
I also want to do some of these this summer http://www.twindragonflydesigns.com/2013/05/plant-print-paintings.html?m=0
I like this project to create raised garden beds
http://www.hometalk.com/442671/turn-used-pallet-crates-into-raised-bed-gardens-so-easy
I am wanting to do this pallet sofa but maybe a little smaller, I have a small space to work with.
http://www.sasinteriors.net/2013/06/diy-outdoor-pallet-sofa/
These look so yummy!! I would love it if you would come and link this up at my link party
Dandelion Wishes Wednesday. I’m also pinning this 🙂
I think this is awesome
http://www.balancinghome.com/2012/06/customized-kitchen-counter-herb-garden.html
I like your Summer Wreath:
http://lollyjane.com/life-is-a-beach-free-printable-summer-wreath/
I’ve been waiting 6 months for my husband to start planking our bedroom walls. This will be a great start towards it!
Sticking with a mailbox theme,I’m wanting to try this for my garden, but now I’m inspired to make it a super cute mailbox! Love the way yours turned out.
http://pinterest.com/pin/252553491576246948
Awesome giveaway! I have been wanting to do this project:
http://lollyjane.com/home-is-where-the-heart-is-sign/
and just need to get my act together and get it done! 🙂
I love this simple ceiling fan makeover: http://www.batchelorsway.com/2013/01/office-redo-custom-ceiling-fan-blades.html. Eventually I will do all my fans…
I love Ana White and her amazing plans. I love this DIY Frame & panel planter.
http://ana-white.com/2013/06/plans/frame-and-panel-planters
Super cute mailbox. I would love to make paint an frame for my instagram prints.
Love the mailbox. Have one attached to my house and that pattern would be great.
Pinned my favorite http://pinterest.com/pin/209628557628348142/
Well, my summer DIY project is to repaint all our door jams in the house. I also need to repaint the hall bathroom cabinet and may add some trim and knobs to give it new life.
ugh. wrong link. One of these – http://simplesagedesigns.blogspot.com/2011/04/kiddie-picnic-table.html
My favorite summer project so far has been all the work we’ve done on our basement! Nothing like replacing sheet rock for some fun couple’s bonding time, right? Hopefully I can get some real “fun” projects in before the summer is over! I also really wanna make one of these – http://simplesagedesigns.blogspot.com/search?updated-max=2011-04-25T05:14:00-07:00&max-results=7&start=28&by-date=false
My kids & I found some clothespins & spray painted them pink & blue & then we used velcro to paste them to the doors to their rooms to hold drawings, important papers…etc so it doesn’t pile in my room 🙂
If it were me, I’d make a long, bench-like structure and fix ALL of those sad looking mailboxes. Then, they’d all be photo-worthy, like yours… You’re so talented, you could really cheer up the mailman 🙂 heehee
I LOOOOOOVE this too! The colors and the shapes are just awesome! I’m in love!
-Mel the Crafty Scientist
I have been wanting to paint a dollar store elephant gold to use as a room décor item! I love it! http://pinterest.com/pin/118571402661408954/
What an awesome looking mailbox!
I like this paint project:
http://www.pbjstories.com/2013/06/dipped-effect-outdoor-bench-and-front.html
I need to do that to ours too! I would live to try out this tutorial though: http://www.littlelucylu.com/2011/05/from-pallet-to-bookshelves.html?showComment=1306975530848&m=1
What a fabulous job! Love the hexagons. Too bad I don’t have an individual mail box to makeover…would have loved to have given a try.
my favorite was a toy chest we built and painted for my daughter with my daughter
We bought red furniture from ikea, two dressers for a nursery, now we are trying to match the paint. I picked up a great changing table at a yard sale, but the color is wrong. And also a mirror and end table…want to match the red furniture. Will be taping off and using a lot of blue painters tape.
I would love to paint my bathroom!
Looking forward to doing this chalkboard backsplash in my home!
http://hayancafe.blogspot.com/2012/10/chalkboard-backsplash.html
Pallet Table
http://pinterest.com/pin/3940718394103299/
Anything Mandi does is amazing!
this is such a cute idea!! i’m loving this summer DIY http://www.infarrantlycreative.net/2012/10/wood-monogram.html
painting the lime green half bath in my new apartment
Im loving this summer wreath http://chasethestar.net/2013/06/summer-wreath-easy-diy.html
Love the fun mailbox.
I also like the easy and fun pinwheels that I can make with my daughters. http://lollyjane.com/summer-decor-paper-pinwheel/
What an adorable mailbox. I think I’d like to do something much the same.
My current mailbox is the old, ugly plastic kind on a rickety metal post.
My favorite summer project so far has been my front porch swing. It’s been much more challenging than I thought it would be, but fun!
My FAVORITE DIY project
http://www.vintagerevivals.com/2013/01/diy-sharpie-wallpaper-tutorial-this-is.html
I mean, seriously, how creative is that!?!
I want to do this this summer to our outside BBQ area. We have a built in BBQ and I think this would class it up!
http://lovelycraftyhome.com/2013/01/28/update-your-boring-builder-bathtub-with-airstone/
I love the personalized look of your mailbox! Of course, this is my favorite Summer painting DIY project. ;] I don’t think my current HOA would allow me to do something like this but you better believe that when we build our dream home – this awesome mailbox redo will be at the forefront of my mind! Forget the dream house I’ll say, I want the mailbox up NOW! =]
I would love to try this wall treatment once we get a house! http://pinterest.com/pin/86975836526665091/
I just love these painted mason jars! I can’t wait to complete them for next year! http://www.maisondepax.com/2013/07/american-flag-mason-jars.html
SUPER cute!! Thanks for the chance!
Oopsie! Hope my mailman doesn’t mind my yellow flag (;
Honestly this is my new favorite…it is so clever and gorgeous…it almost makes me want to make one as an accent in the house I
http://lollyjane.com/mailbox-makeover/
We just purchased a dresser at a consignment shop and are converting it to a changing table. I love this textured DIY http://www.centsationalgirl.com/2013/05/textured-panel-dresser-makeover/
I’d love to stencil more!
http://coveredinmodpodge.blogspot.com/2012/09/cutting-edge-stencil-review-and-giveaway.html?m=1
I can not get over the precision she used to create this etched glass table top. I have done etching before and its difficult to get the etch solid and uniform. Love her technique. http://sandandsisal.com/2013/06/faux-etched-glass.html
So darn cute! I love these painted rosettes!
http://www.bhg.com/decorating/lessons/expert-advice/simple-home-decorating-tips/?sssdmh=dm17.529068&esrc=nwdc060111&email=2267405653#page=4
Such a great idea. Our mailbox looks like your before! Never thought of giving it a revamp. 🙂 Here’s my favorite summer painting project… http://whiletheysnooze.blogspot.com/2012/08/diy-chevron-curtains-tutorial.html
We’ll be painting our front door & shutters when we get moved into our new home at the end of summer!
I love your mailbox. I also enjoy this project at Shabby Chic http://shabbychicinspired.blogspot.com/2011/09/tin-can-caddy.html
Love, love, love this!! It is so stinkin cute!! I want to do this to my mailbox. Love it!!
Oh how stinkin’ cute!!! I may just have to try this soon, myself!!! I have spent the majority of the summer thus far revamping the mismatched furniture in my boys’ room, so not really a “summer” project. However, I ran across the cutest plant hanger today and will be headed to Home Depot tomorrow for the supplies!!! I have Shanty 2 Chic to thank for the inspiration on that one: http://www.shanty-2-chic.com/2013/07/address-numbers-post-planter.html!!!
http://inmyownstyle.com/2012/05/how-to-make-an-outdoor-pillow-using-plastic-grocery-bags.html
I love this idea for making quick, inexpensive outdoor pillows!
Cuuuuute mailbox!! Too bad our mailbox is a community/ neighborhood one! Shanty 2 Chic posted this awesome address and planter post http://www.shanty-2-chic.com/2013/07/address-numbers-post-planter.html ! Super cute too… Think it would look great in our garden in the front yard!! 🙂 P.s. Love your blog!!
I’ve been wanting to build some shelves for my kids’ room, so if I won the gift card, I would go pick up some wood and paint. (Love the mail box!)
i think this one is a new favorite- what postman or woman would not like this makeover- I bet many people never give a second thought to how their box looks! this is really cute!
I like http://www.thriftyandchic.com/2013/05/framed-stenciled-wall-and-giveaway-with.html
I think I am going to say this post is my favorite – link: http://lollyjane.com/mailbox-makeover/?utm_source=feedburner&utm_medium=email&utm_campaign=Feed%3A+LollyJaneBlog+%28Lolly+Jane+Blog%29
Because I wish I had a mailbox to decorate like this…. how cool!
http://www.makeit-loveit.com/2013/07/home-improvement-diy-board-and-batten.html
I adore the way this room make over came out! And I really appreciate how much work that went into it!! Just beautiful!
Faith
Love this project. Great for my own home or for gifts
LOVE your mailbox! Mine looked worse than yours did before I finally got around to changing it. 🙂 My favorite DIY for this summer was for a game. We love it!http://www.skiptomylou.org/2013/06/07/how-to-build-a-washers-game/?crlt.pid=camp.sMbaxGUZ6Faw
http://tatertotsandjello.com/2013/06/red-and-white-summer-party-scotch-blue-painters-tape-painted-party.html
Vintage Beach signs!! Great summer DIY AND paint project in one!
http://diy-vintage-chic.blogspot.com/2013/06/beach-signs.html
I love this fireplace surroundings diy project
http://www.thriftyandchic.com/2011/09/diy-fireplace-surround.html
Makes me wish we had stand-alone mailboxes in our neighborhood! Someday… 🙂 Love the makeover!
So So CUTE!!! It’s a good thing I’m not your Mail -Lady.. Because I just might have to walk away with your ADORABLE mailbox, of course I would still leave you your mail ;)Totally Loving my Rhonna App 🙂
xoxo
My favorite summer DIY project-http://pinterest.com/pin/56787645274304342/
really cute mail box!
I have this pinned to do for my daughter’s room. I think I could get the mailbox and the spray paint with that $75 gift card…plus a few extras maybe? 🙂
http://pinterest.com/pin/106045766197151110/
I have a hutch that I got for FREE that I want to repaint to look like this one! Wish me luck! http://www.bowerpowerblog.com/2012/03/styling-and-profiling/
I wanted to say that your mailbox is stunning! How fun!!! Now I MUST do two things, 1) convince hubby to update our mailbox and 2) figure out the design. Great job and very inspiring.
To enter the giveaway, I have this pinned and plan to complete in a few weeks for our front porch. Its older but its stunning.
http://threemangoseeds.blogspot.com/2011/02/hand-painted-welcome-sign.html
Thanks for the giveaway.
I love, love, love your mailbox. I have been wanting to do something with mine as well. My fave is between your mailbox and S&S’s etched glass project: http://sandandsisal.com/2013/06/faux-etched-glass.html
What a cute mailbox! We are getting ready to I’ve into our new home and quite a few things need makeovers. The mailbox is on the top of my list. Seems easy enough. The kids rooms are looming large.
http://thediyclub.com/2011/02/diy-headboard-and-bed-frame-by-amy/
I love the gardening around this mailbox. http://gibbsspot.blogspot.com/2011/06/send-us-cards-in-our-pretty-new-mailbox.html
Also, according to USPS.com guidelines….
3.10 Color – The color of the mailbox and flag must be in accordance with the following
requirements. The mailbox may be any color. The carrier signal flag can be any color except
any shade of green, brown, white, yellow or blue. The preferred flag color is fluorescent orange.
Also, the flag color must present a clear contrast with predominant color of the mailbox
I love this! I have to make it now!
I am in need of some wood! My husband is dying to make us a new tv table!
I want to re-do my mailbox! And I love using scotch painters tape!! I like it better than the Frog brand. I would use the gift card to buy more tools 🙂 🙂
Love that mailbox ! I would find something to spruce up my patio if I won. 🙂
What wouldn’t I do or buy?
If I won the gift card I would buy the Dremel Moto Saw. I have so many uses for that thing but can’t bring myself to spend the money on one.
I would buy some paint.
I definitely in need of some paint, paint and more paint! I love the mailbox! Makes me wish we had a stand alone instead of a community box 🙂
New nursery!
Our front door!
I would like to try something similar to your mailbox makeover with the Scotch blue painter’s tape.
I need PAINT. PAINT, PAINT, PAINT! Doing two kid room makeovers right now. So, obviously, I will need paint TAPE as well. Super cute mailbox!!
I want to re-do the trim on my windows so I could definitely use some scotch painters tape and a little $$ to Home Depot!
I’d love to do a mailbox make over, but I’d probably use the gift card to buy wood and numbers to create a house marker.
I love blue painter’s tape, I use it for many craft projects and painting and repainting my house. Using on my baseboards coming up which are in bad need of a paint job…
Love your mailbox, going to update mine too…
I’m totally inspired… your mailbox is adorable! I’ve been toying with the idea of transforming my mailbox and haven’t been able to find an inspiration point. Thanks for motivating to get started! Awesome project!!!
how cute, and this is a great thing to personalize!
I have a nightstand that is in desperate need of a spruce up!
I would make over my daughters playtableby using SctochBlue Painters tape and Behr paints from Home Depot. Using them to make a boring one color tabletop into a game top that can be used for matching games, checkers and other fun activities.
I would use the gift card to update my own mailbox or another one of my projects on my DIY list. Awesome job!
So super cute! Too bad we have one mailbox for the whole neighborhood. Maybe I could doll up box number 6?!?! 🙂
I’ve been trying to talk the hubs into helping me do some board and batten in my family room. So far, he’s not going for it.
I could definitely use some painters tape for my front door which is in the process of getting a paint job!
My mailbox is already white. Do you think I will need to rough it up a bit to get new paint to stick?
Kelli- you’re too stinking cute. I am freaking out over the design! I absolutely love it- and now I want to go get a mailbox just to make this! We have a big funky community box- don’t think the USPS would like me jazzing it up, sadly!
I am really in need of a screen door to let in all those summer morning breezes!!
Good point… if my mailbox goes missing I know where to go! Haha! 😀 xoxoxo
Do it! Your mailbox (and mailman) will thank you! LOL (;
I have to do this now!
Ummm hellloooo. I want this mailbox. It has an M (for Mique…who cares about P for my last name), honeycomb and is DARLING. Only I’m in CA, the land of a million mailboxes in one. No stand alones here. Wah wah wah. Also- no acreage here either!! I’m jealous about everything in this post.