How to Make a Folding Growth Chart
Today we’re delighted to share our newest blog friend, Nicole, from Wannabe Crafty with you all. You’re gonna love her style… enjoy!
. . . . .I’m silly excited about guest posting here on Lolly Jane today! I absolutely love Kelli and Kristi’s blog for their totally adorable ideas (without all the fluff posts)!
. . . . .I’m silly excited about guest posting here on Lolly Jane today! I absolutely love Kelli and Kristi’s blog for their totally adorable ideas (without all the fluff posts)!
I’m Nicole and I just started blogging at Wannabe Crafty. Already, blogging has kicked my butt in gear to finally do several of the projects that had previously only been ideas. I love it! Today I’m sharing a tutorial on one of those “idea finally turned project” projects.
We’ve all seen those cute growth charts in the stores, but I always took issue with a few things about them. I didn’t like that they usually only go to 5’ tall because I have a sneaking suspicion that my son will grow taller than that. And I don’t like that most start measuring around 1 or 2 feet— as if I’m really going to be able to hold the chart up exactly two feet off the ground, while simultaneously getting a squirmy boy to hold still and stand up straight, so I can also simultaneously mark off his height every year?! Yeah right!
All my objections are resolved by my new…
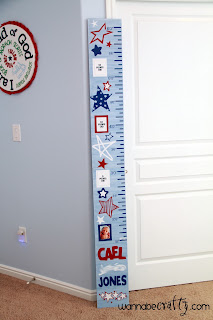
 It’s tall enough to stand on the floor and extend a little beyond the full height I expect my son might grow, but it also folds up for easy storage in a cedar chest! It’s exactly what I envisioned and I’ll definitely be making these for all my future children as well.
Obviously you can alter anything about this tutorial to better suit your needs, but here’s how I made mine:
SUPPLIES:
2 pieces of wood that measure 8.5” wide x 37” tall (Sadly, Baby C just doesn’t have the genes to break 6’; you might want to make your pieces a little taller).
Paint/glaze
Sanding sponge or sand paper
Wiping cloths (I just cut up an old shirt)
Hinges (I used piano hinges because they have a lower profile, it cost me $5 at Lowe’s for the run. I also needed a hack saw to cut the run down to size; I’m pretty sure the fellas at Home Depot or Lowe’s could help you out with this though.)
Magnets (I used four ¾” round magnets that I got at Lowe’s for 2 or 3 bucks.)
Super glue or clear silicone or a similar adhesive
Vinyl or paint for the ruler tick marks and graphics
Something to measure with (I used my sewing ruler and a measuring tape)
Pencil
Glue dots
Four wallet-sized pictures of your cutie
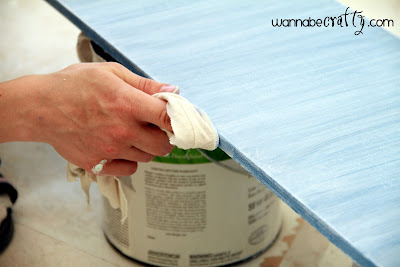
I cut my wood to size and sanded just enough to knock all the edges. Then I got right to painting. If you want to simplify this project, just paint it one solid color and call it good! I loved the wiped glaze effect I saw on this PB growth chart, so I grabbed a few different colors of blue latex paint I had on hand and some clear mixing glaze and got busy.
First I painted both sides of my wood pieces white as the base color. Then I mixed up a little blue paint and glaze and starting wiping it on the wood in a horizontal direction.

Be careful that you don’t leave excess paint running down the sides—I just frequently ran my finger along the sides and back to grab any little drips.
Let it dry. Turn the wood over and repeat. I put three different colors of blue on before I got the look I wanted.
Then I used a fine grit sanding block to lightly sand the wood in the same horizontal direction that I wiped the glaze. If you distress the edges, I would recommend NOT distressing the two edges that will meet up when the growth chart is standing fully upright (the edges that will be connected by the hinges).

Mount your hinges BEFORE you apply your vinyl, because the hinges might create a slight gap between the two wood pieces that would add some extra space in your growth chart ruler. Piano hinges really minimize this effect, which is why I used them. I used a hack saw to cut the hinge run down to 8 3/8” (just a hair more narrow than my wood). Again, I think the Home Depot/Lowe’s employees could help you with this.

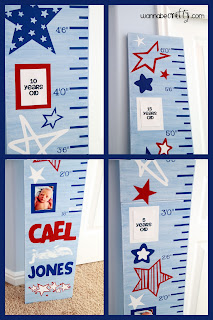
I used my Silhouette to design and cut out the vinyl. I seriously considered just free-handing it though- you don’t need any fancy cutting machine to do this project. If you free-hand, just use a pencil and ruler to draw your marks and then paint over them! If you use a vinyl, use your measuring device to make sure you position it at the correct height.

(If you have a Silhouette and want the file for the ruler marks, just shoot me an email at nicole(at)wannebecrafty(dot)com).
I used glue dots to stick Baby C’s picture on the vinyl ‘frame’.

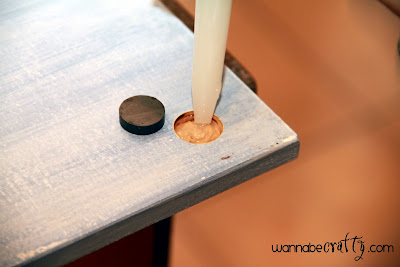
You’re almost done! Just adhere your magnets to the back with the silicone or super glue (My hubby is a super-handyman so he insisted on routing out holes for the magnets, but this is not necessary).
And you’re done!!!

More shots:

Come visit me at Wannabe Crafty for more craft, sewing, and home decor projects and tutorials!!
. . . . .
Big thanks to Nicole for guest blogging. She’s super talented as you can see! Go visit her…now! (:
. . . . .
Big thanks to Nicole for guest blogging. She’s super talented as you can see! Go visit her…now! (:


WOW! This is fantastic! Thanks so much for this one, I'll be linking.
I need to start doing more crafts for me! I always do them with my kiddos 😉
Following you back and thanks for visiting me!
so darn cute and very professional looking. loving it!! 🙂
Newest follower from the I <3 Blogging Blog Hop!
Come return the visit and enter one of our awesome giveaways when you have the chance 🙂
—
Jade
The Sleppery Mind
Hey Lolly,
I am new to the mommy blogs and love hops. I'm your newest follower. I just adore the growth chart
I have started a children's book blog and would love to have you visit and follow.
I'm having a giveaway tomorrow at The Nutter Sisters, plz sign up http://bit.ly/hoVihS
Have a great week.
Thanx,
Dana
Little Book Monster
That is awesome! can't wait to see what else you come up with. Thanks for the follow…following you back from Adventures at Greenacre : )
So clever! I love all the detail- especially that the child's picture is included! Stopping by to say hi to her 🙂
How cute! She did a GREAT job on the growth chart. Now I am off to "stalk" her blog 🙂
what a cool idea! super neat that you can fold them up!
Mindy @ Crafting Gals
craftinggals.blogspot.com
Oh my goodness those are super cute!! I am your newest blog follower! Great ideas here! 🙂 Erin
http://www.healthybranscoms.com