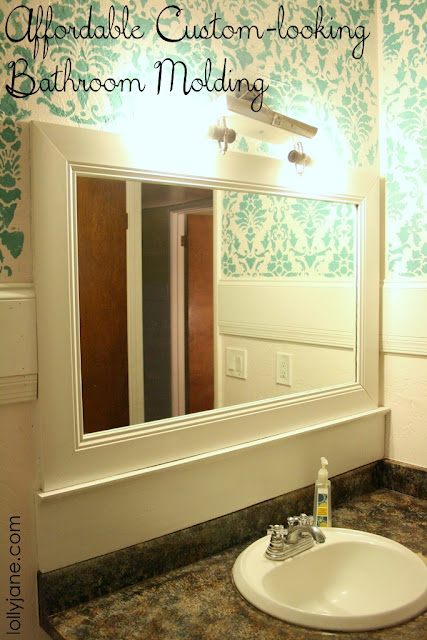
I’m currently working on my guest bathroom but thought I would share this fun trick with you all. This is a quick DIY for Affordable Custom Bathroom Molding.
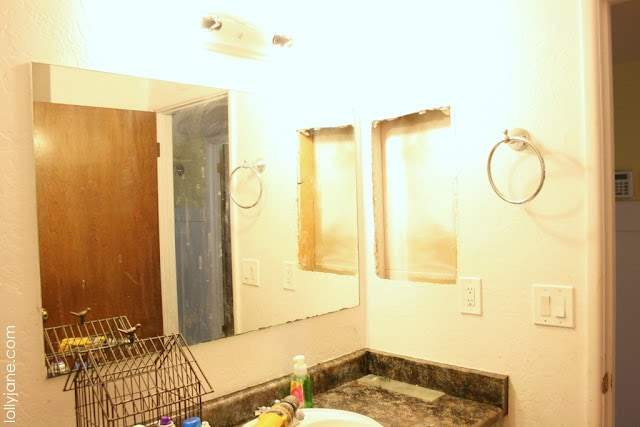
I really wanted to show you the full before of this bathroom but can’t find the year old pic, darnnit!! Here are some when I re-did the counter top using granite paint (check it out here).
See that huge gap above the vanity and the bottom of the mirror? I thought about ripping down the nasty mirror and replacing it with a giant molded one. I looked and looked and couldn’t find the right size at an affordable price so decided to use what I had on hand.
First I ripped out the medicine cabinet and drywall’d the hole (I didn’t drywall myself, I used my handyman who was working on my back porch anyway, score!) Guess what?-I hate medicine cabinets!
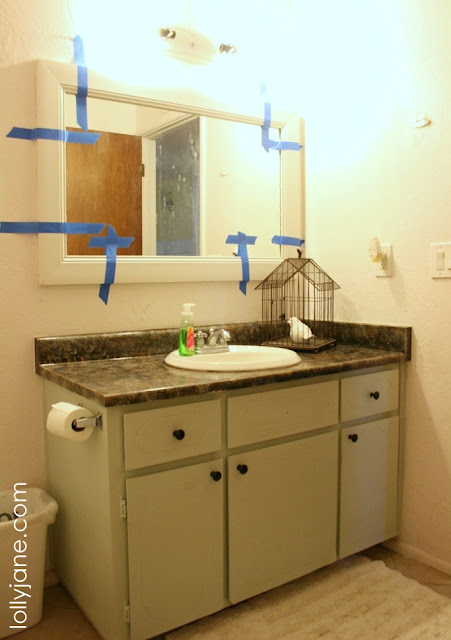
They’re too tall for my kids to reach and aren’t deep enough for good storage (sorry if you love yours, I’m not a fan). Next I created faux molding around the mirror. I’m talking foam molding from Home Depot, people, it’s amazing! SO lightweight and paired with Liquid Nail, it was a breeze to put up!
Basically, all you do is cut your molding to size using a miter saw, apply liquid nail to the back of the molding then use painters tape to hold it in place until it’s dry (overnight). There are more detailed tut’s out there if you google them, I’m sure! It’s that easy!
HEY!-we’re not done: here’s where the “custom” part comes in. Remember that awkward gap of wall peeking through?? Weird right? I know exactly what I’m going to use it for to make up for my now non-existent medicine cabinet! Mason jars! (Okay, not original but they’ll be perfect for this space…more on that in the future!)
All I did was cut a scrap piece of MDF to size then nailed it in place with a brad nail gun. I then painted it (along with a scrap piece of trim) which I also nailed into place and bam: custom molding!
Wondering about the side molding (below)?
We easily matched it to the existing molding from the previous owner (see pic below). It was easy to do since it’s one 12″ piece of floor molding plus a 2″ piece of trim butted up against it.
After the molding was applied, I stenciled the walls with turquoise paint, I couldn’t handle all that white in there!! Sidenote: ADORE Cutting Edge Stencils! For real, yo!! They’re the best! [See my mustard yellow dining room here, Kristi’s stencil curtains here and to check out the name of this stencil, click here. OH!—>if you want 10% off, use LJ10 at checkout: score!!]
So that’s where I’m at right now with this little guest bathroom (which is actually our main guest bathroom plus our kids full-time bathroom, we only have 2 bathrooms in the house)!
Still on my list:
Apply beadboard to 2 walls (mirror wall + side wall where medicine cabinet was).
Caulk and paint: mirror, new molding and beadboard.
Hang jars for kids’ toothbrushes on new molding.
Hooks for guest hand towels.
New light!!! (Notice it’s hanging?? Ghetto 😉
Shower curtain (Hide the gross shower, eek!)
Accessorize! (New matching towels, rugs, etc.)
I love re-doing rooms on the cheap! Hope this helps some of you!
What an excellent idea, gives the mirror a unique look… Shows what with a bit of skill and time you can create something quite unique…
Is that what the molding is called? Foam molding? I went looking for it and Home Depot and asked 3 different guys, none of which had any idea what I was talking about! Thanks:)
We have a small half bath that I have been wanting to redo and you have given me some great ideas! I especially love the granite countertop paint! I would love to redo my kitchen counters with that!
Great job! I love the mirror molding. Very creative and looks fantastic!
I love your bathroom project! And I love your BATH letters for your towel hooks, where did you find those?
Thanks Miss Jaime! We just need to get it finished up, the final is SOOO cute!! Love your support, girl! XO
I absolutely LOVE this! Great project! I’d love for you to link up to my first ever linky party, Ta-Da Tuesday 🙂 check it out here !