diy soap pouch
Oh my gosh! I can’t believe I’m here! I gotta tell ya, folks, I’m on Cloud 9. I first found the Lolly Jane girls right after I started blogging…and I was instantly smitten. I think I clicked the “follow” button before I’d finished reading even one post…seriously…they are that awesome. But you already knew that…(smile)…
Let me introduce myself…my name is Maggie & I write a little blog called Midwestern {Sewing} Girl…
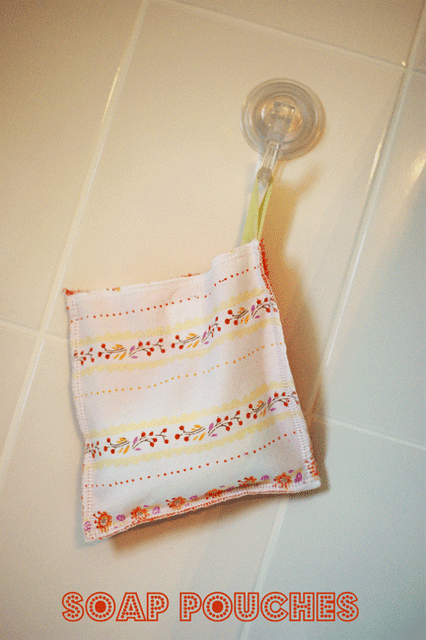
there you can find all sorts of projects that I embark upon on my quest to make my house just a little more awesome. Today I’m sharing my DIY Soap Pouch with you all.
But first, here are some of my favorite posts:
I’d love if you’d swing by sometime and say “hello!”
Now, Kelli & Kristi asked me to guest post today and, after I picked my jaw up off the floor, I racked my brain trying to figure out something cool enough to share with you…I hope I did OK…
First let me explain just how much my kids LOVE to take baths…they ADORE getting clean…they would take a bath twice a day, if I let them…
OH WAIT…did I say “love” and “adore?” – what I meant to say was ABSOLUTELY POSITIVELY HATE & ABHOR taking a bath or shower…seriously…I think it cuts into their playtime…or their used to the funk, or something. Getting them into the tub is like pulling teeth…truthfully. Soooo, I made this quick and easy project to make bathtime just slightly more appealing…and they all were able to help me…and I don’t mean the kind of help like “You’ll be the most help if you just sit there on the couch, honey” help…I mean like honest-to-goodness help…
Here’s what we’re making:
This is all you need:
Plus some grosgrain ribbon, a little scrap of velcro, some fabric scraps & a sewing machine…
I got my washcloths in a pack of 18 (yep 18!) for around $5.00 at Target. score…
First you’ll want to cut your washcloth & fabric…my washcloths were 11″ x 11″ so I cut the washcloth into 4 equal pieces 5.5″ x 5.5″ – (yep…you can get 4 pouches out of 1 washcloth! Wha???? oh. yeah.).
Cut your fabric into pieces that are the same size as your washcloth pieces are…
—–
***Now I’ve used a serger to finish the raw ends of my fabric & washcloth…if you don’t have a serger, no worries…just cut your fabric & washcloth to account for a hem around your pouch…(you probably won’t be able to get 4 pouches out of 1 washcloth, but you can definitely get 2).***
If you are not using a serger, then now is the time to find the top ends of the fabric & washcloth & finish the raw ends with a small hem.
—–
Then take a small piece of hook & loop tape (like Velcro…I got mine at Jo-Ann for .99)…about 1″ x 1″ and sew either the hook or the loop piece to the wrong side of the fabric & the other piece to same place on the washcloth)…
After your hook & loop tape is sewn on, take a small piece of grosgrain ribbon (about 4″ long), fold it in half & sew your “loop” to the top inside of one of your pieces…about 1 1/2″ in from the edge.
—–
If you are not using a serger, then you will want to place your pieces right sides together and sew around the sides and across the bottom of your pouch. Then turn your pouch right-side-out & you are finished! Yay!
—–
Place your pieces wrong sides together and serge all the way around the sides and bottom of your pieces…you are done!

Pop your soap inside, fasten up the top & watch your kids flock to the tub! Well, “flock” may be the wrong word…maybe “let themselves be dragged to the tub” is more appropriate…at least in my household…
Easy peasy! And my kids loved choosing the fabric they wanted for their pouch, helping me sew along the sides & putting the soap in…(my 3-year-old was most excited about that part…)
You can pop the soap out after each bath to let the pieces dry separately or to wash the pouch, or you can just hang the whole thing up to dry until the next time…
So that’s it…I hope you’ve found a new project that you can do with your kids some rainy day this summer!
Thank you sooooo much, Kelli & Kristi, for letting me drop by today! You girls rock…







Doesn’t it make your soap all mushy? Just wondering. It’s really cute.
Hmmm not sure since this is our guestie but we’ll ask 😉 Thanks!
awesome idea ladies!!! xo
The soap pouch is so cute! And I'm a huge Maggie fan too.
"Sew" simple, practical & pretty! I am amazed at all your creativity, Maggie! Also now following Lolly Jane.
http://altered-artworks.blogspot.com
This is super cute & totally functional~ love that! Stopping by Midwestern Sewing Girl now… 🙂
Smart lady! I love this idea! Do you think it would work okay if I just zigzagged the edges together instead of serging or hemming? And could your next project be tubby straps to keep my little fellow from spending his whole bathtime fighting me to stand up and walk around in the tub? 😉
Oh, darling girls…thank you so much for having me over today!!! Yay!!
Very cute and functional!
Super super cute idea! I am a huge Maggie fan and I am so excited to see her here! :o) Yahhhhh for fun ideas and great bloggers! I am excited to get to know this amazing blog better now too!
Jaime from Crafty Scrappy Happy
I love it!!! Our bar soap always gets so icky sitting by the side of the tub. I linked to your tutorial on Craft Gossip Sewing:
http://sewing.craftgossip.com/tutorial-hanging-soap-pouch/2011/06/29/
–Anne
My grandma used to have some of these…..I haven't thought about these since I was little. Darling Maggie!
Fabulous projects!! Cute soap pouch!
Sarah
http://craftingandcreativity.blogspot.com/