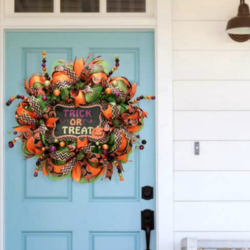
DIY Halloween Mesh Wreath
A combination of deco mesh, bright ribbons and glittery floral picks make this colorful DIY Halloween mesh wreath extra festive!
Servings 1 Wreath
Ingredients
- 16" Work Wreath Frame
- 1 Roll 21" Lime Green Deco Mesh
- 2 Rolls 1 1/2″ Ribbon Chevron, Back & Orange Jack-O-Lantern
- 1 Roll 2 1/2″ Ribbon Orange
- 3 Large Floral Picks
- Scissors
- Wire Cutters
- Glue Gun
Instructions
- Gather the end of the mesh and attaching it to the wire work wreath using the tinsel sprigs on the work wreath. Start on the inside ring.
- Once the end is secure, go down the mesh about 12 inches and gather it again and attach it with the next tinsel sprigs.
- Continue this process around the inside ring and then move to the outer ring and repeat.
Adding Ribbon
- Take the three ends together and attach them to the wreath with the tinsel sprigs. Start on the outer ring.
- Continue attaching the ribbon around the wreath, alternating back and forth from the outer ring to the inside. No need to use every tinsel sprig. Skip over one each time.
- Let them poof and lay loose.
- Cut a few 12″ pieces of each ribbon.
- Then take one of each ribbon and pinch them together in the middle. Secure them to the wreath with the tinsel sprigs.
- Add a set of ribbons everywhere you attached the first round of ribbon.
Adding the Sign
- Use your wire cutters and cut the wire in half. Use these wires and secure the sign to the wreath by wrapping the wire around the tinsel sprigs.
- Make sure you position your sign so that the top corners align with empty sprigs so the wire can wrap easily around them.
Adding the Glitter
- Take the large floral picks and cut them into smaller pieces.
- To attach these glittery accents, just add a dab of glue to the stem and tuck the stem down into the mesh. Add glitter picks all around the wreath to fill empty spots.
- And now your festive Halloween wreath is ready to hang.