Gilding pumpkin topiary | Wood bunting sign
Today we have a two-for-one post! We’re sharing easy Halloween and fall crafts that you can do for a few bucks! I’m loving these versatile goods that I’ve added to my fall and Halloween home decor collections. First up are these gorgeous liquid gilding pumpkins. I love how they turned out and would you believe they are from the dollar store?! I know! These are so easy to make, you’ll be surprised at how little work is required.

I bought 3 pumpkins at the dollar store since I knew I wanted to recycle the vase from my candy corn tree craft a couple years ago. I wanted to use both my silver and gold liquid gilding so I decided to alternate the colors for the pumpkin topiary and sandwich silver in the middle.

These turned out so cute, they’re pretty enough on their own. However, I wanted to add one more layer to tie them together and match the vase so I dug through my Martha loot and found these cute adhesive stencils. Perfect! They stuck so well to the pumpkins (I did allow them to dry overnight, for the record) and they didn’t peel off any of the gilding at all.

After the stencil was dry, I drilled a hole into the bottoms of the pumpkins and through 2 of them stems (one will be on top so don’t drill through all 3 completely!) then slid a dowel through them all ($.55 at Home Depot). Definitely beginner level project! Note: the gilding requires nail polish remover to clean the brushes and stains your hands so wear latex gloves to avoid a mess. I love the result for this quick and easy transformation!

I love how clean and simple my fall display is. I have more to add but this table in my entryway is all about fall and looks so chic, adore it!


Can’t you just see this on your fall table scape or fall mantel? I am pretty much wanting to put these all over my house (; And why not? So inexpensive! You could use these for your Halloween decor as well, depending what colors you decorate with.

I feel like this is a what comes first, the chicken or the egg question….
Do you decorate for fall, then Halloween then Thanksgiving? Or do you skip fall and head straight for Halloween?
I prefer the first option because a lot of my fall decor is also Thanksgiving decor so I tend to ignore fall (since AZ is so stinkin hot until October anyway!) but IF you do the above mentioned order, you will want to keep reading for a fun Halloween idea, a wood bunting sign! This was so easy using Martha’s darling cardboard stencils, my 9 year old helper was so excited to see this come to life!

To make this fun board, you need a piece of wood. We painted ours a dry brush technique with gray acrylic paint. We then punched out all the negative space from the stencils. I used the triangle banner stencil and outlined 4 triangles onto my wood with a pencil. I used tape to hold in place while I painted.

I let my girls take over the stenciling since it was the easy part. They just blotted and stayed inside the blue, easy peasy.

When we were done, I lightly outlined the new banners with black to give them a spooky effect but also to give solid definition since a lot of gray was showing through. I free handed “holes” in each corner of the banners as well as “ribbon” in between to mock a real bunting. I used another set of stencils, holiday laser cut reusable ones, to paint a black bat on each banner. Then I blotted on some coarse glitter to give it another dimension.

Super simple Halloween sign that requires some time, but little talent since the stencils do the work for you. Again, a definite beginner level project! 
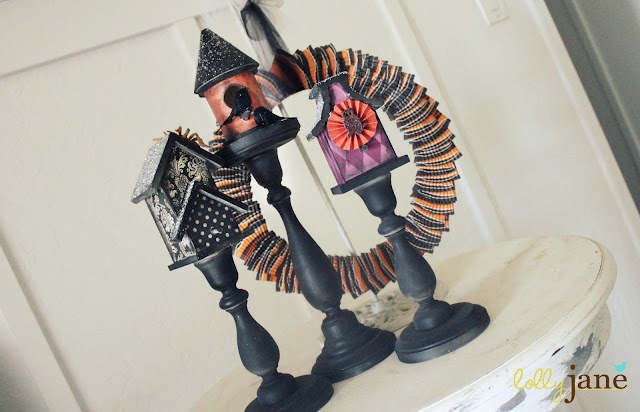
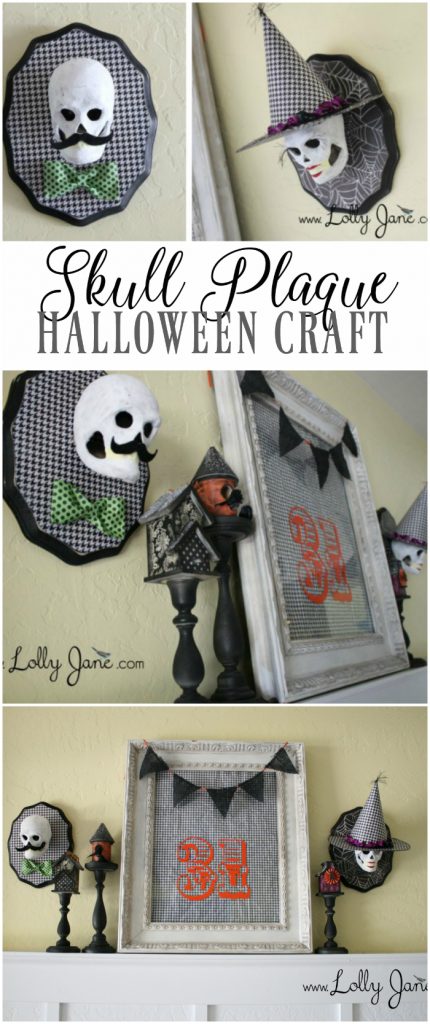
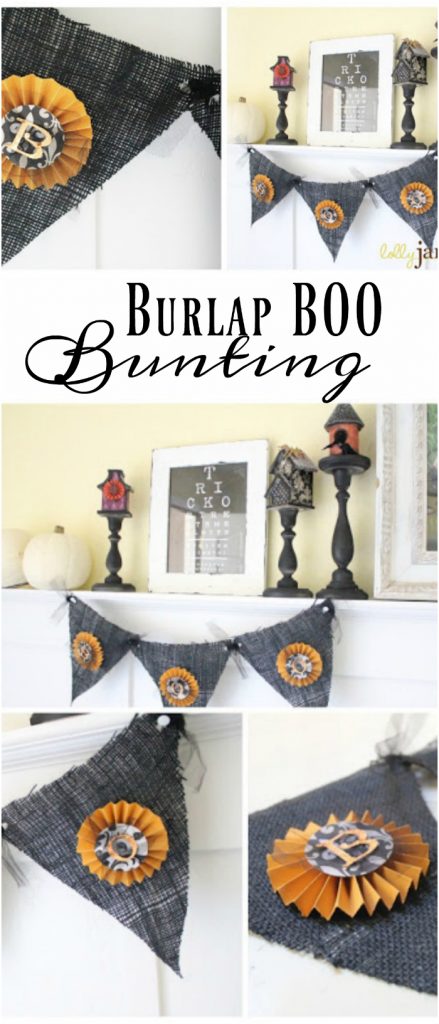
And just for fun, here’s a shot of my Halloween mantel, it’s always changing and it’s hard to grab the full shot since it’s a 12 foot wall in my entryway. I like colorful Halloween goods, not black and white or super spooky items. Do you like creepy or fun Halloween decor??

Visit all of our Halloween decor like our Haunted birdhouse tutorial:

These are so cute!! Just wanted to let you know that I linked to this post from my blog roundup of no-carve pumpkin decorating ideas. Thanks for sharing!! http://theroadtocrazy.blogspot.com/2014/10/31-days-of-halloween-2014-day-11-31.html
thank you very much about this post
its amazing idea , i like your states 🙂
I absolutely LOVE those pumpkins! (Fellow MS Halloween crafter here, hello!) I am impressed that the gilding covered up the orange pumpkins so well. I was shy to experiment with the gilding because I mistakenly thought it would be difficult, but now I want to give it a try!
So many ideas from our MS loot! I also love that you included the kids in with the project. I have twin girls and they were drooling over the supplies as much as I was. They’d totally be able to help with a stenciling project! Fun stuff!
And your blog?! So cute! Love your furniture projects!
Kelli – dollar store pumpkins never looked so good! Love a little bling and these are fabulous!
I’m batty for the banner too!
Kelly
I was just looking at these pumpkins at the Dollar Tree and now I need to go buy some and do this
Your Halloween ideas are amazing! My weekly linky party–One Creative Weekend–has gone spooky this week in honor of my thirteenth party. If you haven’t already, I hope you’ll visit “One Creative Weekend” on OneCreativeMommy.com (open every Fri-Wed) and link up this idea and anything else you’d like to share. (You can include non-Halloween posts as well, but feel free to link up as many Halloween-themed posts as you like.) There are two categories—one for Halloween and one for everything else.
Wow great minds think alike! I linked up a gilded project too – come check it out. I love the topiary – so pretty!
Bunting is so popular now and I love how you incorporated it onto wood. You ladies are inspiring me with these great Fall ideas!
Thanks so much! At first I thought it was going to be a craft fail!
You guys are sooooo good at crafting and getting stuff done! I can barely keep my house clean over here 🙂 GOOD job as always girls!
Hah! Your house is darling, nice try 😉
Amazing as usual gals…love both of these looks. Happy October!
Thanks, Sarah girl! XO
Cute! I think the stenciling on the pumpkins are just the right extra touch. Love how those turned out! The bunting is super cute, too, and definitely something my boys would love to help with. 🙂
Thanks, Michele!! Can’t wait to see your project!
XOX