diy granite countertops
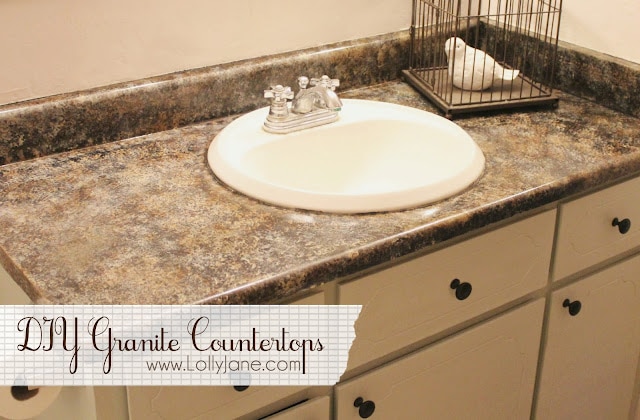
Does anyone else have an outdated bathroom? When we were asked to review Giani’s Granite Paint for Countertops, I jumped at the opportunity because my guest bath was beyond outdated… it is 30 years old and was just screaming for a makeover. With the help of Giani, it gave me a kick in the pants to get ‘er done. I chose their chocolate brown kit {they sell 6 other color choices} and am pretty stinkin’ happy with the outcome for my diy granite countertops!

This was the easiest part of the project. After taping off the walls, I simply rolled the black primer over my existing avacado green countertops. In the hard to reach spots {behind the sink, small crevices} I used a small foam brush.Gah, this bathroom was simply grody. But can’t you already see the improvement just with the primer?
Step 2: Sponge on 3 different colors.
This phase was really fun! Basically, all you have to do is sponge on each color until you’re happy with the look. I started with the medium tone and sponged it evenly. The hard to reach spots were a little more tricky so I cut off a small chunk from the big sponge which worked great! After waiting 4 hours for the first color to set, I sponged on the chocolate brown color. I was excited to see the look coming together already. After another 4 hours, I sponged on the last color, a pretty gold color. It nicely tied the first two colors together and truly, truly completed the granite look. Don’t forget to seal it: two coats/ PS: My husband was out of town during my makeover and he thought it was real granite when he came home! It looks that real and is so very pretty.
I used my favorite SW Sea Salt paint to give the cabinet a fresh look and wow, it really does look like a brand new vanity. This process is very forgiving. You don’t have to sponge it on perfectly, it does all the work for you. Seriously, I ♥ this product! For less than $50, you can make your counter tops look like a million bucks… well, at least a thousand (; This is just the beginning to the bathroom makeover. I’m so excited to finish it up this month and show you all how easy and cheap a bathroom re-do can be. And it all started with counter tops.




Hi there. I was wondering how your nathroom counter is holding up now after all of this time? Also, have you wiped it with more than clorox wipes in all this time? TY!
Hi there! It held up pretty strong for about 4 years until we remodelled. It would come off in everyday wet spots like under the soap dish. We did use Comet as well with no problems. I had to repaint every 18 months or so in 2 spots is all. Hope that helps!
Counter top looks great, but what color did you paint the cabinets. It looks like an off white…I’m currently doing the same project right now.
It’s Sherwin-Williams SEA SALT. Love that color!
Wow – what a difference. Good job! What did you use to seal?
Great question! We used the sealer provided in the kit. It does a great job and is still protecting the paint months later! (:
Hi Liz!
It wasn't smelly at all, which was really nice. I would do it if I was pregnant, no worries at all. We only have 1 working sink as far as bathrooms right now so with me/hubby + 4 kids..I still did this project amid everyday living. It's a quick process but you need to allow for proper dry time in between so you pretty much do a little step each day.
Hope that helps. (: Kelli
That looks amazing! Thanks for the step by step. Can I ask, was the process really smelly? I heard that they paint they give you has some pretty bad fumes. I would like to do it, but I just don't know if I should wait, since I'm pregnant. Thanks! [email protected]
Thanks, Kelli! 🙂 I may just do it….
Hi Kelly, you're a no-reply blogger so I hope you get this reply!
It is easy to clean. If you scrub it, it may take off some layers until its fully cured but so far, it's held up. I've only cleaned it with the Clorox wipes though…
I'm sure their site will answer more q's (:
I'm going to do my kitchen next, right now I'm painting the cabinets. A lot of people have done their kitchens, if you check out Giani's FB page, you'll see tons of before/afters and lots of positive feedback!
(: Kelli
It looks great! Is it pretty easy to clean it? I'm considering doing this to our kitchen counters (they are a most hideous teal-green laminate, blech). I just wonder how well this would hold up in a busy kitchen, with all the cleaning, etc…???
Your countertop looks really great!
Your countertop looks really great!
Shirley said:
Could you tell me where you got the paint for $50.00? I love this look and I love your blog.
It looks fantastic! I had the chance to try it as well and I was also so impressed. I'm about to use my leftovers to do my daughter's bathroom as well. I used a different color combo than you did – you can see it here if you want: http://www.dukesandduchesses.com/2012/02/painted-granite-countertops.html
wow! totally diff look! but i got to say that green counter was pretty special ya know…… who knows how many times we brushed our teeth on that very same counter!
now it looks pretty too 🙂
good job sis!
Wow! This is incredible! So impressed by you clever girls!
This is awesome!!!
I never knew there was such a product out there but it looks great on your counter top!
Wow, it really does look amazing! So beautiful!! Happy week my friend.
I have seen this product in stores but didn't know if it would really work. Thanks for "road testing" it for us. Your bathroom looks amazing now. I saw your post over at "Creations by Kara" blog party.
Wow! The bathroom looks amazing!
This is so cool! I love it! =)
Alesha <3
Popping in from Tip Junkie. This looks fab. Thanks for the inspiration.
Looks great! I remember spongepainting my bathroom walls back in the day…..looks a lot better on counter tops!
WOAH…that's paint!?! Okay, I'm sold. 🙂
It looks great! What a neat product. Gonna pin this 🙂
Wow . . . that looks really wonderful! I've seen this product before but been a little skeptical. Painting is NOT my thing so this seems like something I would ruin, but it doesn't look too difficult. What a difference from the before shot!