So happy to have our pal, Emily here today. She’s showing off this DARLING canvas photo transfer tutorial:
We met Emily along with Aimee/It’s Overflowing a few months ago and fell in love with them both. Emily is so fun in person, we couldn’t get enough of her (as we stayed out till 2am 🙂
I’m SO excited to be visiting Lolly Jane today. I love these cute sisters! Every single time I visit, I leave inspired!
Today I have a fun tutorial for easy artwork using your personal images and a home printer. My baby girl turned one in February (of course, I have lots of “tweet” birthday details on my blog, if you’re into FUN parties!) and I wanted to display one of the photos from her 1 year photo shoot. I remember seeing this tutorial awhile back, so I decided to give it a whirl. I love the way it turned out!
Basically, to create a canvas transfer, you take a laser printed copy of a photograph and, using a gel medium, transfer that image to a blank canvas. Due to the method of transfer, your image takes on a beautifully aged appearance.
To start this process, you’ll need: a plain canvas a paint brush scissors
water
gel medium (I used Liquitex- Matte Super Heavy Gel from Hobby Lobby)
a laser printed image on regular printer paper
**please note, the original image has my daughter facing the other way. In my haste, I forgot to tell my printer to print a mirror image. Don’t skip this step, especially if your image has words in it!
DIRECTIONS:
1) Gather your supplies, print a MIRROR image copy of your photograph and trim the border from that image
2) Paint a generous amount of the gel medium over the entire canvas surface
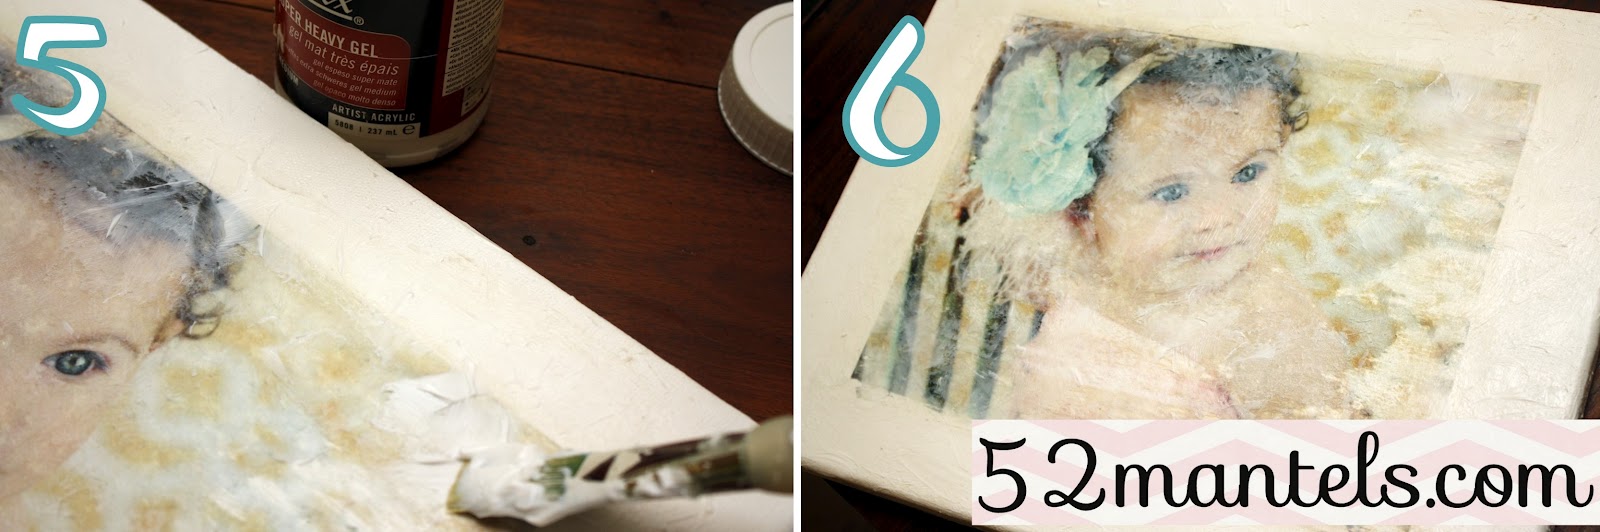
3) Press a copy of the photo, image side DOWN, onto the canvas, making sure to center it and then smooth out any bubbles or wrinkles. Then…walk away for 6 or more hours before going on to step 4!
4) After 6+ hours, sprinkle your canvas with water (I just used my finger tips to do this, but a water bottle would have been even better!) and begin rubbing the paper from the canvas, leaving the image on the canvas. This is the trickiest part of the entire process! Be extra gentle as your rub and peel the paper from the canvas.
*A few tips: Do NOT over-wet your canvas or over-rub one area. The spot in the lower right corner is where I used way too much water and the brown blur in the top left hand corner is a spot where I rubbed too aggressively. Learn from my mistakes! Also, be especially careful over faces. It would be very easy to distort the face by excessively rubbing. Imagine your cutie pie with only one eyebrow or no nose. Yikes! Be extra delicate in that region.
5) When the paper has been peel from your canvas and the image is completely dry, paint a thin coat of the gel medium over the entire canvas. After the first coat dries, go over your canvas in short, back and forth strokes, leaving random peaks in the gel. This will add texture to the canvas and give it the look of a painting. The gel will go on white, but dry clear and matte.
This process might sound complicated, but it’s really not! It’s a lengthy project only because you must allow the gel to dry between steps. I started one evening, let it dry overnight and finished the next day. It was SO worth the time, though!
I wonder if Kristi will try this out after she snaps a few pictures of her newest little Lollybaby? I sure hope so! 🙂
Thank you so much for this craft! I was asked to make a quilt square for my nieces baby shower. I used a picture of her holding
her baby sister for the first time! It came out perfect!! Can’t wait
for her to see it.
Awesome!! Your daughter is *adorable*! 🙂 Just wanted to say that you can also use a credit card to smooth the photo onto the gel medium on the canvas. This helps to eliminate a lot of the wrinkles that otherwise happen when you smooth it with your fingers. 🙂
Hi I just LOVE this idea! ♥
.. but I am limited to an A4 size due to using the printer.
Can you use an actual photo using the same process? I am looking at doing a 12″ x 12″ for friends of one of their Wedding photos?
Umm yes Kristi WILL be trying this once his newborn pics are back from the photographer 😉 Love this tute, Em!!! Thanks millions for sharing w/ our readers!!


Thank you so much for this craft! I was asked to make a quilt square for my nieces baby shower. I used a picture of her holding
her baby sister for the first time! It came out perfect!! Can’t wait
for her to see it.
That sounds SO sweet, Peggy! Happy to hear the tutorial was spot on! 🙂
Awesome!! Your daughter is *adorable*! 🙂 Just wanted to say that you can also use a credit card to smooth the photo onto the gel medium on the canvas. This helps to eliminate a lot of the wrinkles that otherwise happen when you smooth it with your fingers. 🙂
Hi I just LOVE this idea! ♥
.. but I am limited to an A4 size due to using the printer.
Can you use an actual photo using the same process? I am looking at doing a 12″ x 12″ for friends of one of their Wedding photos?
You sure can!!
such a beautiful result!
Such a cutie little girl. I'll take the steps and try by myself….
Your little girl is sooo pretty.
So, am I reading this right you can use the printer you have at home? Awesome, i don't have to go to Staples!
Thanks for having me over, cute friends! I wish I could hop a plane to AZ and snuggle with Baby D :). I bet the newborn pictures are ADORABLE!
Umm yes Kristi WILL be trying this once his newborn pics are back from the photographer 😉 Love this tute, Em!!! Thanks millions for sharing w/ our readers!!
XOXO
This is so creative! Great tutorial! Thanks for sharing 🙂
Jenn @ Crafting Gals
craftinggals.blogspot.com